


SAFETY INSTRUCTIONS
WARNING
OPERATION
TO REDUCE THE RISK OF FIRE, ELECTRICAL SHOCK, OR IN-
JURY TO PERSONS, OBSERVE THE FOLLOWING:
1. Use this unit only in the manner intended by the manufac-
turer. If you have questions, contact tile manufacturer at the
address or telephone number listed in the warranty.
2. Before servicing or cleaning unit, switch power off at ser-
vice panel and lock service panel to prevent power from
being switched on accidentally.
3. Installation work and electrical wiring must be done by a
qualified person(s) in accordance with all applicable codes
and standards.
4. Sufficient air is needed for proper combustion and exhaust-
ing of gases through the flue (chimney) of fuel burning equip-
ment to prevent backdrafting. Follow the beating equipment
manufacturer's guideline and safety standards such as those
published by the National Fire Protection Association (NFPA),
and the American Society for Heating, Refrigeration and Air
Conditioning Engineers (ASHRAE), and the local code au-
thorities.
5. When cutting or drilling into wall or ceiling, do not damage
electrical wiring and other hidden utilities.
6. Ducted fans must always be vented to tile outdoors.
7. Do not use this unit with any solid state speed control de-
vice.
8. To reduce the risk of fire, use only metal duetwork.
9. This unit must be grounded.
TO REDUCE THE RISK OF A RANGE TOP GREASE FIRE:
1. Keep fan, filters and grease laden surfaces clean.
2. Always turn hood ON whet) cooking at high heat.
3. Use high range settings on range only when necessary. Heat
oil slowly on low to medium setting.
4. Don't leave range unattended when cooking.
5. Always use cookware and utensils appropriate for the type
and amount of food being prepared.
TO REDUCE THE RISK OF INJURY TO PERSONS IN THE EVENT
OF A RANGE TOP GREASE FIRE, OBSERVE THE FOLLOWING:*
1. SMOTHER FLAMES with a close-fitting lid, cookie sheet, or
metal tray, then turn off tile burner. BE CAREFUL TO PRE-
VENT BURNS. If the flames do not go out immediately,
EVACUATE AND CALL THE FIRE DEPARTMENT
2. NEVER PICK LIPA FLAMING PAN -You may be burned.
3. DO NOT USE WATER, including wet dishcloths or towels -a
violent steam explosion will result.
4. Use an extinguisher ONLY if:
A. You know you have a Class ABC extinguisher and you
already know how to operate it.
B. The fire is small and contained in the area where it started.
C. The fire department is being called.
D. You can fight the fire with your back to an exit.
*Based on "Kitchen Firesafety Tips" published by NFPA.
CAUTION
1. For general ventilating use only. Do not use to exhaust haz-
ardous or explosive materials and vapors.
2. To avoid motor bearing damage and noisy and/or unbalanced
impellers, keep drywall spray, construction dust, etc. off
power unit.
3. For best capture of cooking impurities, your range hood
should be mounted 18-24" above the cooking surface.
4. Please read specification label on product for further infor-
mation and requirements.
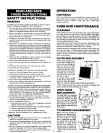
CONTROLS
The fat) and light are each controlled by a rocker switch. Th
light switch has two positions, "ON" and _OFF'. The fan switch
has three positions -"HIGH", "LOW", and "OFF". ("OFF" is the
middle position.)
CARE AND MAINTENANCE
CLEANING
Always disconnect the electricity from the range hood before
servicing. Keep your range hood clean by using a mild deter-
gent suitable for painted surfaces. DO NOT USE ABRASIVE
CLOTH, STEEL WOOL PADS OR SCOURING POWDERS. The
fan assembly is designed to be easily removed for cleaning. See
"Fan Assembly RemovaF below.
Aluminum filters used in vented hoods are dishwasher safe.
Avoid extremely caustic cleaning agents, however. They may
discolor the aluminum. Clean filters once a month.
Ventless hoods are equipped with a special ventless filter. Do
not wash the filter - its effectiveness will be destroyed. The
ventless filter will last up to twelve months with normal use.
Replace the filter whenever the blue side becomes noticeably
dirty or discolored.
FILTER REPLACEMENT
Filters are removed by turn- (clip in low position)
ing the filter retaining clip
to the side and lifting the
filter out. Place the filter
under the embossed retain-
ing tabs on the back of the
fan housing. Turn the filter
retaining clip so that the
low end of the clip holds
the filter in place.
In ventless hoods, MAKE
SURE THAT THE BLUE Filter
SIDE OF THE FILTER IS
NEXT TO THE FAN WHEN THE FILTERIS INSTALLED.
NOTE: Make sure that the arrows on the filter retaining clip
point toward the front and back of the hood.
LIGHT BULB
REPLACEMENT
The light bulb (not supplied
with hood) should be 75 Watt
maximum. Remove the light
lens covering the bulb by
pressing the two extending
tabs together until they re-
lease from the retaining slots
in the hood. Screws
TO REMOVE FAN ASSEMBLY
Make sure that power is
disconnected. Remove filter.
Remove two screws holding
motor bracket to range
hood. Unplug fan assembly.
Be careful not to allow fan
assembly to drop when
screws are removed. Be
careful not to bend or
damage the fins on the blade
- they will be put out of
balance.
Screws