


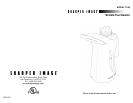

WRINKLE-FREE STEAMER
PRODUCT INFORMATION
76
USING THE WRINKLE-FREE STEAMER
FILLING WATER RESERVOIR WITH WATER
1. Place Wrinkle-Free Steamer on a flat, level surface.
2. Make sure grounded power cord is unplugged from electrical outlet.
3. If unit has been in use, allow it to cool for at least 5 minutes.
WARNING: Always allow unit to cool before adding water. Cold water
added to a hot boiler may cause hot water and steam to shoot out of fill hole.
4. Cautiously unscrew and remove Water Reservoir Cap.
5. Carefully fill Water Reservoir with water from a faucet or cup. Pay attention to
water level in Water Reservoir using Reservoir Level Window on side of unit,
and fill up to the MAX (7 oz.) fill line.
NOTE: To prolong the life of your Wrinkle-Free Steamer, we recommend
using distilled or de-mineralized water.
WARNING: Extreme caution should be used when pouring water into the
Water Reservoir. Do not look directly down into fill hole when filling. Keep
your free hand and any children or pets at a safe distance.
NOTE: Do not exceed the MAX fill line. Too much water in the Water
Reservoir may cause excess water spitting in steam.
9. Replace Water Reservoir Cap, using care not to over-tighten it.
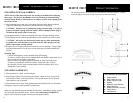
• The Steam Nozzle (1) emits a flow of hot, penetrating steam.
• The Water Reservoir Cap (2) safely contains steam within the Water Reservoir,
and must be removed in order to fill the unit with water.
• The Heater Indicator Light (3) illuminates when the unit’s heater is active.
• The Handle (4) is designed to stay relatively cool while providing the optimum
amount of safety and user comfort.
• The Reservoir Level Window (5) lets the user clearly see how much water is in
the Water Reservoir. It should not be filled above the MAX (7 oz.) fill line.
• The Water Reservoir (6) is the tank in which water is stored for use by the unit.
• The Rubber Accessory Housing (7) is used for connecting the Lint Remover and
Fabric Brush to the Steam Nozzle. Connecting the Rubber Accessory Housing
along with the Fabric Brush or Lint Remover is required and will reduce excessive
water spitting from the Steam Nozzle.
• The Fabric Brush (8) fits into the Rubber Accessory Housing and delicately
smoothes wrinkles from fabrics.
• The Lint Remover (9) fits into the Rubber Accessory Housing, and is useful for
removing lint and loose threads from fabrics.
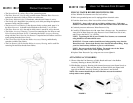
ATTACHING ACCESSORIES
1. Choose either the Lint Remover or Fabric Brush and insert it into Rubber
Accessory Housing as shown (FIGURE 1).
2. Slide Rubber Accessory Housing (with inserted accessory) onto Steam Nozzle as
shown ( FIGURE 2). Make sure that holes on Steam Nozzle are aligned with
open slot on Rubber Accessory Housing so that steam is not blocked.
NOTE: The steamer should only be used with these accessories attached
to help reduce water spitting.
FIGURE 1
FIGURE 2