


801 146 00 03/00
GB
Please detach and retain
Please observe:
J Connection to the electricity supply
must only be carried out by a qualified
electrician. He must be satisfied that the
installation complies with the current
regulations of the respective country.
All effective requirements of the
respective electricity supply company
must also be met.
J To satisfy the relevant safety
instructions, a plugĆandĆsocket device or
an allĆpole disconnector with a contact
gap of at least 3 mm must be fitted on the
installation side. If the appliance is
connected via a plugĆandĆsocket device,
the plug must be accessible following
installation of the appliance.
J The appliance corresponds to Safety
Class I and may be operated only in
conjunction with a protective conductor
terminal.
J Safeguard via B or C miniature
circuitĆbreaker (formerly L or G in
Germany).
J The hob cannot be installed above
an oven, a refrigerator, a dishwasher, or
a buildĆunder washing machine.
J In the event that an intermediate panel
is present, the clearance to the lowest
part of the hob must be at least 5 mm.
J In accordance with heating testing
standards, the appliance corresponds to
Safety Class Y". Only one side of the
appliance may be installed next to a high
room wall or a highĆsided unit.
J Worktop:
The worktop must be 19-40 mm in
thickness. They must be horizontal, level,
and tight to the wall in order to prevent
the ingress of split liquids.
J Fitted furniture must be heatĆresistant
up to 90 ºC. This applies especially to
veneer, edge bands, plastic surfaces,
adhesives and varnishes.
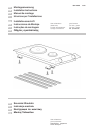
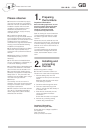
1.
Preparing
the furniture
Important information:
Before installing appliances, ensure
that the furniture and worktop have
all the required cutouts. Remove
sawdust, otherwise electrical
components may malfunction.
Refer to drawing for cutout dimensions.
The gap between the sides of a cutout
and a left or right wall must be at least
120 mm.
Where the cutout is positioned over the
side panel of a kitchen unit, the side panel
must be lowered by cutting out a piece at
least 25 mm in width to allow the hob to
sink into position.
To prevent swelling due to dampness,
seal the lateral cut edges with silicone
rubber, heatĆresistant lacquer or cast
resin.
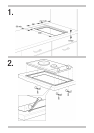
2.
Installing and
connecting
the hob
J See rating plate for voltage.
J The mains connection cable is conĆ
nected to the under side of the appliance.
1. Remove sealing strips from the
protective foil and lay them around the
cutout.
Make sure that the ends of the strips
meet, leaving no spaces.
2. Guide the cable through the cutout.
3. Connect a prescribed plug to the
cable, or connect the cable directly to
a connector box.
4. Place the hob horizontally into the
cutout and tighten the clamps
underneath.
Ensure that the cable is not trapped.
5. Remove any protruding sealing
material using a suitable tool.
Important information
when removing the hob:
Ensure that the no voltage is applied to
the appliance.
Open the clamps.
Push up the hob from below.