


7
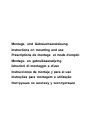
Introduction to the Hood - Fig. 1.1
1. Light Switch
2. Motor Speed Switch
3. Illumination of the cooking surface
4. Grease Filters/grease filter support grate
5. Light Cover Supports
6. Pull-Out Drawer
Model with Grease Filter Support Grate
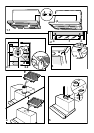
Opening the Grease Filter Support Grates - Fig. 2.1
a. Remove the pull-out drawer completely.
b. Push the A knobs inwards toward each other (in the
“Open” direction as indicated on the plastic knob itself).
c. To remove the grates completely, use the B spring
fasteners, which act as pins to hold the grate in place
(Fig. 3).
Model with Self-supporting Metal Filters
Removing the Grease Filters - Fig. 2.2
a. Remove the pull-out drawer completely.
b. Press the side handles C (some models are supplied
with handles Z - Fig. 2.3) towards the opposite side
and remove the filters.
Putting the Filters Back in Place
a. Remove the pull-out drawer completely and mount the
grease filter so that it covers the drawer.
b. Close the drawer and install the remaining grease filter.
Opening the Light Cover Support
a. Remove the pull-out drawer completely.
b. According to model in possession:
Lamp D with hook locks type A - Fig.2.2
Move the bracket hook locks towards each other (in
direction “Open” as printed on the plastic part of the
lock). Lamp F with hook locks type G - Fig. 1.2
Move the hook locks as indicated by the arrows and
completely remove the lamp from the housing (Fig.
1.3).
Systems Available
Venting Outdoors
The air is vented outdoors through a duct which must be
connected to the exhaust opening K (Fig. 5) by means of
the flange H. The diameter of the exhaust duct must be
exactly the same as that of the flange.
Air Recirculation
— The air is cleaned by means of charcoal filters and then
circulated back into the room.
— The use of a charcoal filter is necessary when the hood
cannot vented outdoors either because ducting is not
available or cannot be installed.
— The filtered air is returned from atop the cabinet through
a duct that passes through the cabinet itself.The
diameter of the duct must be the same as that of flange
H (Fig. 5).
The deflector J can be fixed to the outlet hole using the
two screws provided
(Fig. 4).
To fit or replace a carbon filter:
a. Request a charcoal filter from the retailer, specifying
the model and type of hood.
Caution! Some charcoal filters come covered with a
plastic film to protect their filtering properties. If this is the
case, remove the film before installing the filter.
b. Remove the pull-out drawer completely.
c. Remove the grease filters or the grates.
d. Place the activated carbon filter in position:
1) Version with one motor: insert the filter in its housing
over the plastic grill and rotate it until it locks in
position (Fig. 6).
2) Version with two motors: to assemble the filter,
insert it in its seating and fix it in position using the
clips L (Fig. 7)
e. Remove the grease filters or grills
To remove the carbon filter, follow the procedure
described in item 1) or 2), depending on the version) in
the reverse order.
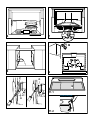
Installation
When installed, the distance between the hood and burners
must be not less than 43 cm for electric burners or 65 cm
for gas or mixed-fuel burners.
Caution
This appliance is designed to be operated by adults.
Children should not be allowed to tamper with the controls
or play with the appliance.
Do not use the cooker hood where the grill is not correctly
fixed! The suctioned air must not be conveyed in the same
channel used for fumes discharged by appliances powered
by other than electricity. The environment must always
be adequately aerated when the cooker hood and other
appliances powered by other than electricity are used at
the same time. Flambé cooking with a cooker hood is
prohibited. The use of a free flame is damaging to the filters
and may cause fire accidents, therefore free flame cooking
must be avoided. Frying of foods must be kept under close
control in order to avoid overheated oil catching fire. Carry
out fumes discharging in accordance with the regulations
in force by local laws for safety and technical restrictions.
The manufacturers refuse to accept any responsibility for
damage to the hood or its catching on fire because of failure
to observe the above instructions.
Electrical connection
The electrical tension must correspond to the tension noted
on the label placed inside the cooker hood. Connect the
electrical plug, where provided, to the an easily accessible
GB