


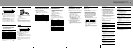
Before using the card remote commander for the
fi rst time, remove the insulation fi lm.
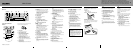
OFF button
To power off; stop the source.
EQ3 (equalizer) button
To select an equalizer type (XPLOD,
VOCAL, EDGE, CRUISE, SPACE,
GRAVITY, CUSTOM or OFF).
To adjust the equalizer curve, see
“Customizing the equalizer curve” on the
reverse side of this sheet.
Volume control dial/select button
To adjust volume (rotate); select setup items
(press and rotate).
SOURCE button
To power on; change the source (Radio/CD/
MD*
1
/USB/AUX).
Disc slot
Insert the disc (label side up), and playback
starts automatically. You can play CD-DA
(also containing CD TEXT), CD-R/CD-RW
(MP3/WMA/AAC fi les also containing
Multi Session) and ATRAC CD (ATRAC3
and ATRAC3plus format).
Display window
USB terminal
To connect to the USB device.
(eject) button
To eject the disc.
PTY (Program Type) button
To select PTY in RDS. After pressing
, press –/+ to search for a
station.
(front panel release) button
SEEK –/+ buttons
CD/MD*
1
/USB*
2
:
To skip tracks (press); skip tracks
continuously (press, then press again within
about 1 second and hold); reverse/fast-
forward a track (press and hold).
Radio:
To tune in stations automatically (press);
fi nd a station manually (press and hold).
Receptor for the card remote
commander
MODE button
To select the radio band (FM/MW/LW);
select the unit*
3
; select the play mode*
4
.
DSPL (display)/DIM (dimmer) button
To change display items (press); change the
display brightness (press and hold).
RESET button (located behind the front
panel)
Detach the front panel and press the RESET
button with a pointed object, such as a ball-
point pen.
Display items for CD / Repeat and shuffl e play / Playback USB devices /
Display items for USB / Listening to music on a Mass Storage Class type audio
device / Listening to music on “Walkman” (ATRAC Audio Device) / Adjusting the
sound characteristics / Customizing the equalizer curve / Adjusting setup items
CDX-GT410U
©
2006 Sony Corporation
AUX
OFF
DSPL
MODE
PUSH SELECT
SEEK
SEEK
PAUSE
DIM REP SHUF
EQ3
SOURCE
123456
GP/ALBM
AF
/
TA
PTY
12
q
j
q
h
4 5 863
CDX-GT410U
q
a
q
d
q
;
9 q
s
q
f
q
g
7
q
k
Notes
• Before operating the unit for the fi rst time, or
after replacing the car battery or changing the
connections, you must reset the unit.
• Pressing the RESET button will erase the clock
setting and some stored contents.
Number buttons
CD/MD*
1
/USB*
2
:
/: GP*
5
/ALBM*
6
–/+
To skip groups/albums (press); skip
groups/albums continuously (press and
hold)*
7
.
: REP
: SHUF
: PAUSE*
8
To pause playback. To cancel, press
again.
Radio:
To receive stored stations (press); store
stations (press and hold).
AF/TA button
AF (Alternative Frequencies)/TA (Traffi c
Announcement), TP (Traffi c Programme):
Each time you press , the item
changes as follows:
AF-ON TA-ON AF, TA-ON
AF, TA-OFF
AUX input jack
To connect a portable audio device.
The following buttons on the card remote
commander have also different buttons/functions
from the unit.
() / () buttons
To control CD/radio/MD/USB, the same as
–/+ on the unit.
VOL (volume) +/– button
To adjust volume.
ATT (attenuate) button
To attenuate the sound. To cancel, press
again.
SEL (select) button
The same as the select button on the unit.
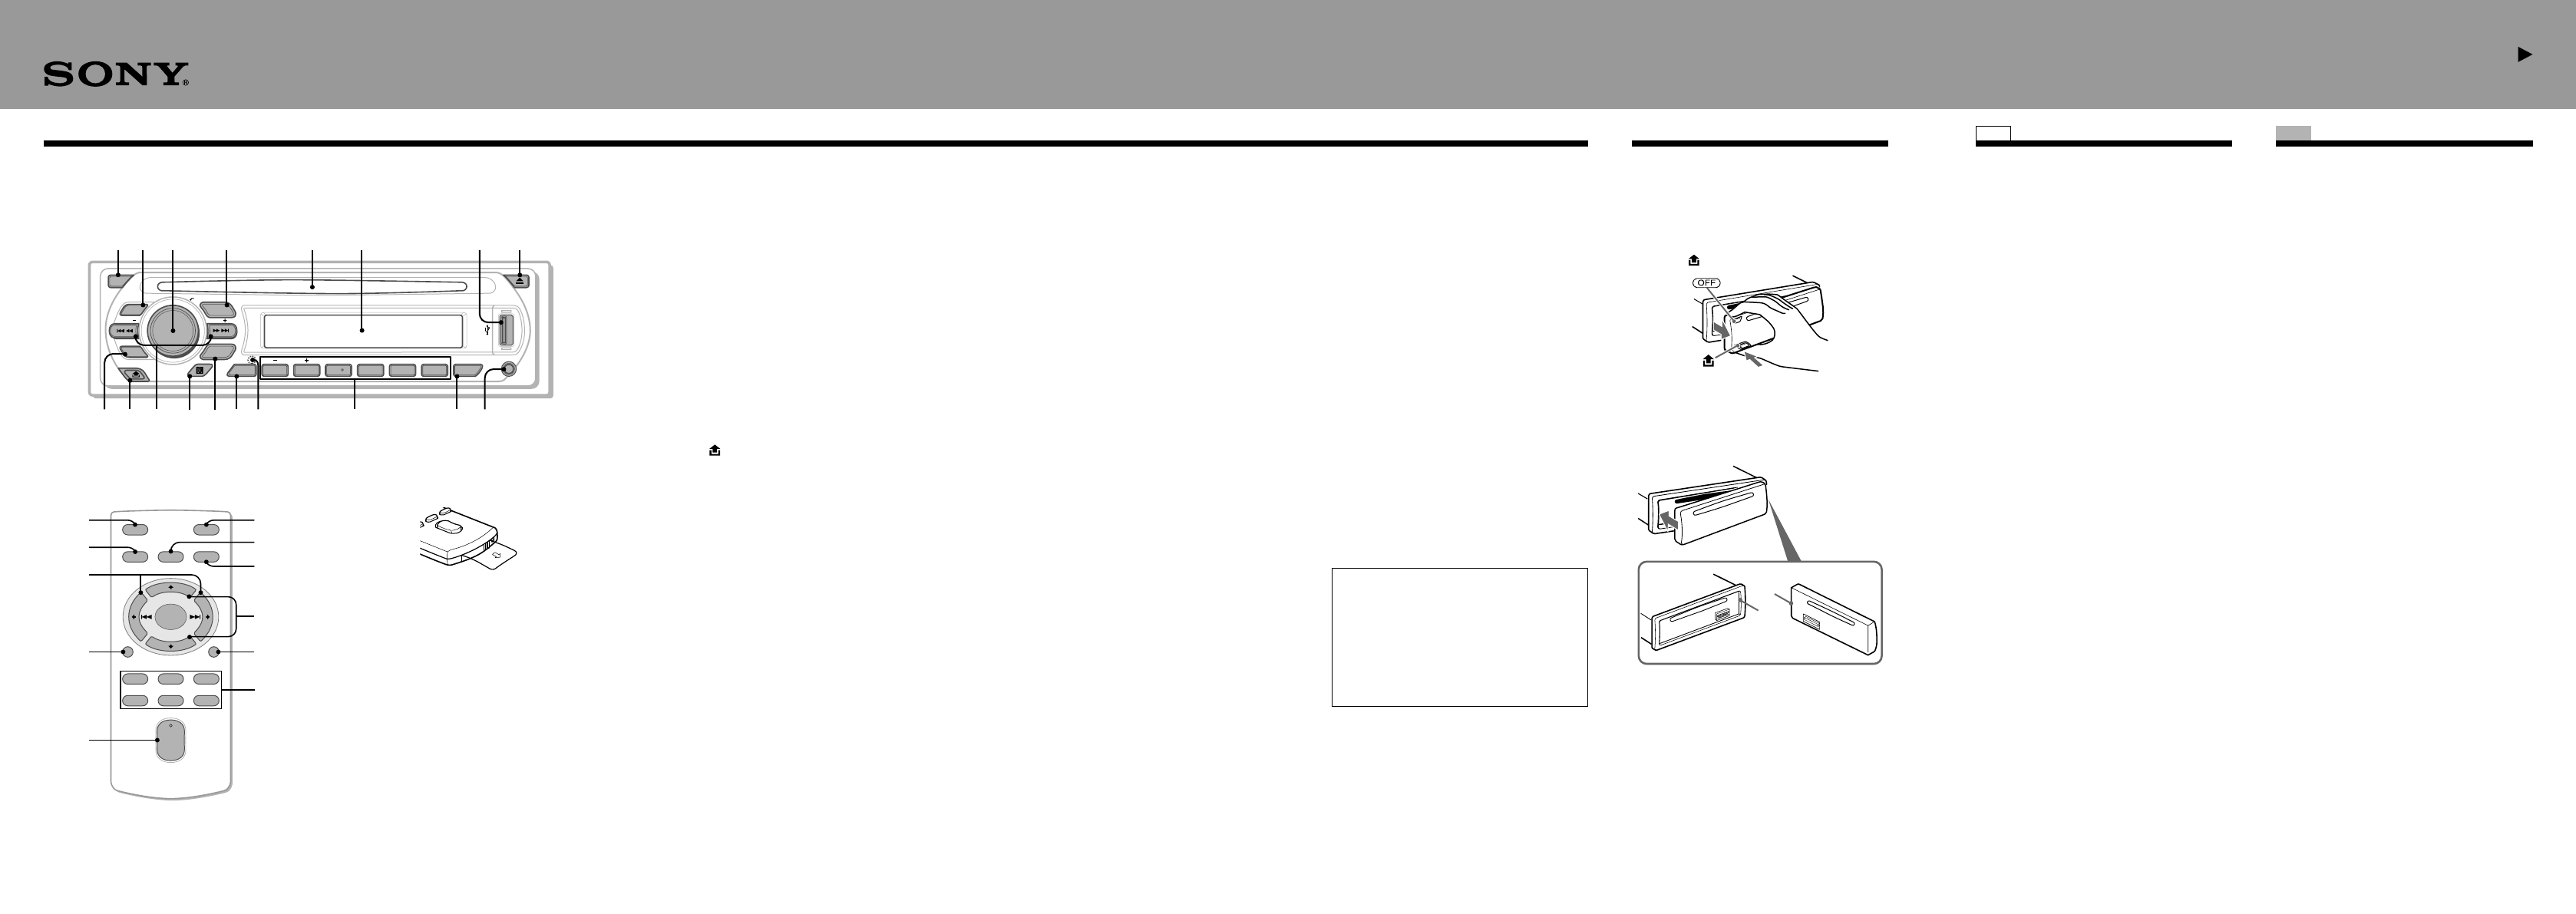
Location of controls and basic operations Detaching the front panel
You can detach the front panel of this unit to
prevent theft.
1 Press .
The unit is turned off.
2 Press , then pull it off towards you.
Attaching the front panel
Engage part of the front panel with part of
the unit, as illustrated, and push the left side into
position until it clicks.
B
A
OFF
DSPL
SCRL
SEL
SOURCE
MODE
132
465
ATT
VOL
+
–
+
–
4
ws
qd
1
wf
ql
qf
wa
w;
wg
wd
Main unit
Card remote commander
RM-X151
(+) / (–) buttons
To control CD, the same as / (GP/
ALBM –/+) on the unit.
SCRL (scroll) button
To scroll the display item.
Number buttons
To receive stored stations (press); store
stations (press and hold).
*1 When an MD changer is connected.
*2 When a USB device is connected.
*3 When a CD/MD changer is connected.
*4 When an ATRAC Audio Device is connected.
*5 When an ATRAC CD is played.
*6 When an MP3/WMA/AAC is played.
*7 If the changer/USB device is connected, the
operation is different.
*8 When playing back on this unit.
Notes
• When ejecting/inserting a disc, keep any USB
devices disconnected to avoid damage to the disc.
• If the unit is turned off and the display disappears,
it cannot be operated with the card remote
commander unless on the unit is
pressed, or a disc is inserted to activate the unit
fi rst.
Warning if your car’s ignition has no
ACC position
Be sure to set the Auto Off function. The unit
will shut off completely and automatically in
the set time after the unit is turned off, which
prevents battery drain. If you do not set the
Auto Off function, press and hold
until the display disappears each time you
turn the ignition off.
SET UP
Setting the clock
The clock uses a 24-hour digital indication.
1 Press and hold the select button.
The setup display appears.
2 Press the select button repeatedly
until “CLOCK-ADJ” appears.
3 Press +.
The hour indication fl ashes.
4 Rotate the volume control dial to set
the hour and minute.
To move the digital indication, press
–/+.
5 Press the select button.
The setup is complete and the clock starts.
Tip
You can set the clock automatically with the RDS
feature. For details, see “Adjusting setup items” on the
reverse side of the sheet, and set to “CT-ON” (Clock
Time).
RADIO
Storing stations automatically
— BTM
The unit selects strong signal stations and stores
them. You can store up to 6 stations per band
(FM1, FM2, FM3, MW, or LW).
Caution
When tuning in stations while driving, use Best
Tuning Memory (BTM) to prevent an accident.
1 Press repeatedly until
“TUNER” appears.
To change the band, press
repeatedly. You can select from FM1, FM2,
FM3, MW or LW.
2 Press and hold the select button.
The setup display appears.
3 Press the select button repeatedly
until “BTM” appears.
4 Press +.
The unit stores stations in order of frequency
on the number buttons.
A beep sounds when the setting is stored.