


INSTALLATION HEAVY DUTY COUNTERLINE
PAGE 20 OWNER’S MANUAL 1182845 REV 8
INSTALLATION
5. Light the burners. Set the control knobs to only low temperatures for now.
6. Check (and, if necessary, adjust) the burner air shutters using the procedure on page 29.
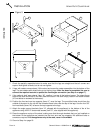
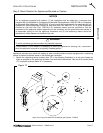
Step 7: Final Installation Steps for Griddle Models
This step applies only to the installation of griddle models. New griddles should be carefully tempered and
cared for in order to avoid possible damage. To break in a new griddle, do the following:
1. Wipe the griddle surface clean.
2. Light all the griddle burners. For griddles with thermostatic controls, turn all knobs to 200°F for one
hour. For griddles with manual controls, turn all knobs to “LOW” for one hour. Then gradually bring
each griddle up to frying temperature.
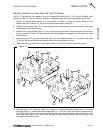
3. Spread three or four ounces of beef suet, or as a substitute, baking soda, to season it. Never allow
water on a hot griddle and never wash it with soap and water.
4. For griddles with thermostatic controls, check (and, if necessary, adjust) the thermostatic valves that
control the griddle’s surface temperature. Follow the procedure on page 31.
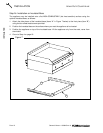
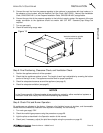
Step 8: Final Installation Steps for Lava-Rock Charbroilers
This step applies only to the installation of lava-rock charbroiler models. Such models are shipped with the
lava-rock briquettes in bags located between the lava-rock grates and the top cooking grids.
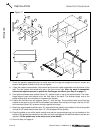
1. Lift out the cooking grids to reach the bags of lava-rock briquettes.
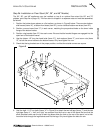
2. For each section, open the bag of lava-rock briquettes and spread them evenly on the lava-rock grate.
The briquettes must be spread evenly to avoid “hot spots.” Discard the empty bags.
3. Reposition the cooking grids above the briquettes.