


54
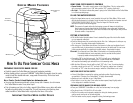
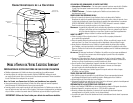
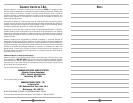
COFFEE MAKER FEATURES
REMOVABLE
FILTER
BASKET
CARAFE
WARMING PLATE
POWER BUTTON
CARAFE
LID
WATER RESERVOIR
COVER
HOW TO USE YOUR SUNBEA
M
®
COFFEE MAKER
PREPARING YOUR COFFEE MAKER FOR USE
• Carefully unpack the Coffee Maker and remove all packaging materials.
•
Before making coffee in your new SUNBEAM
®
Coffee Maker, thoroughly clean the carafe,
carafe lid and filter basket with warm, soapy water. Rinse and dry. Do not use harsh
or abrasive cleaners.
N
OTE
:
Carafe, Carafe Lid and Basket are dishwasher safe.
• You may wipe the warming plate with a clean, damp cloth. However, do not immerse
the Coffee Maker in water or any other liquid.
• Prior to brewing your first pot of coffee, operate Coffee Maker once or twice with water
but without ground coffee or a paper filter. This will remove any dust that may have
settled inside the Coffee Maker which might affect the flavor of the coffee.
IMPORTANT:
USE COLD WATER FOR BEST RESULTS
USING YOUR COFFEE MAKER’S CONTROLS
• Power Switch – This switch controls power to the Coffee Maker. This is a rocker switch
with a momentary contact to turn
“ON”
and a positive “OFF” position (right side).
• On Light – This button indicates that power is going to the Coffee Maker and the Coffee Maker
is in normal operating stage.
FILLING THE WATER RESERVOIR
• Open the hinged water reservoir cover located at the top of the Coffee Maker. Fill the carafe
with the desired amount of cold water. Empty the water from the carafe into the water reservoir.
POUR SLOWLY WHEN CARAFE IS FULL. Close the hinged lid. Place the carafe
with the lid in place on the warming plate.
NOTE: The amount of brewed coffee after the brewing process will always be slightly less
than the amount of water placed into the Coffee Maker, since some water is absorbed
by the coffee grounds and filter. Add a little extra water at the beginning so that you have
the exact number of cups desired.
PUTTING IN THE COFFEE
• Pull the filter basket straight outward. Insert a standard flat paper filter into the filter basket
or a pre-prepared coffee pack.
• Place the desired amount of ground coffee into the filter. Use 1 tablespoon of coffee per cup
(5 oz.) of water. One coffee scoop equals 2 tablespoons.
• After using your Coffee Maker several times, the amount of coffee may be adjusted to suit
your particular taste, by decreasing or increasing the amount of coffee used. Be sure to use
coffee ground specifically for automatic drip coffee makers. Snap basket into place.
C
AUTION
:
Do not operate your Coffee Maker if the basket is not inserted completely.
If the basket does not insert completely, check to see that the filter packet
is properly seated and snap basket into place.
•
Turn switch “ON” to start the brew cycle. The “ON” Light will go on, indicating that
the Coffee Maker
has begun the brewing cycle. In a few minutes the Coffee Maker
will complete the brewing cycle and switch over to the warming mode.
• With the Auto-Off feature, the unit will turn itself “OFF” after 1 hour. To continue heating
the coffee, simply turn the unit “OFF” and back “ON” again for another hour of heating.
• Turn switch to “OFF” when the carafe is empty or when the Coffee Maker is not in use.
HINTS FOR GREAT TASTING COFFEE
• A clean Coffee Maker is essential for making great tasting coffee. Regular cleaning,
as specified in “Cleaning Your Coffee Maker,” is highly recommended.
• Always use fresh, cold water in your Coffee Maker.
• Store coffee in a cool, dry place. Once coffee has been opened, keep it tightly sealed
in the refrigerator to maintain freshness.
PREPARING COFFEE MAKER FOR BREWING COFFEE
• Place your SUNBEAM
®
Coffee Maker on a flat, level surface away from any edge.
• Plug the unit into a 120 Volt 60 Hz AC only outlet.
• The lid of the carafe must be properly snapped on during the brewing process
and the carafe must be set on the warming plate.
• The filter basket must be properly snapped in during the brewing process.