


4
Using your Snack Heroes
™
Egg Cooker and Poacher
Before the first use
Wipe over the surface of the heater plate with
a smooth damp cloth. Wash the plastic parts
in warm soapy water, rinse and dry.
To Cook
1. Place the base of the appliance on a dry,
flat level surface.
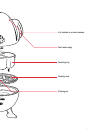
2. Use the lid, while covering the steam hole
with your finger, to measure the amount
of water required. Use the markings on
the lid as a guide and see table on page
5 for correct water quantities.
3. Pour the water into the heater plate of
the egg cooker and poacher.
4. Place the cooking rack on a flat counter
surface.
5. Pierce the large end of each egg with the
piercing pin in the cooking rack.
Note: This will prevent the eggshell from
cracking while the eggs are cooking.
Caution: Avoid injuries from the piercing pin.
6. Place eggs pierced end up in the cooking
rack.
7. Place cooking rack on base and cover
with lid.
Note: Without the lid on the eggs will not
cook properly.
8. Insert the plug into a 230-240V power
outlet and turn the power on. The
indicator light will glow, indicating the
eggs are cooking.
Warning: Do not remove lid whilst the water
is boiling.
9. Once all the water has evaporated the
egg cooker and poacher will “tweet”
signalling that the eggs are ready.
10. Unplug the egg cooker and poacher.
11. Take the lid from the egg cooker and
poacher using the cool touch wings.
12. While eggs are still on the cooking rack,
rinse briefly under cold water and serve
immediately.
To Poach
1. Place the base of the appliance on a dry,
flat level surface.
2. Use the lid, while covering the steam hole
with your finger, to measure the amount
of water required. Use the markings on
the lid as a guide and see table on page
5 for correct water quantities.
3. Pour the water into the heater plate of
the egg cooker and poacher.
4. Lightly butter or oil the poaching sections
to be used.
5. Place the cooking rack on the base and
fit the poaching tray on top, so that the
legs of the poaching tray are in the centre
of the egg holes.
6. Break one egg at a time into each section
of the poaching tray and cover with lid.
Note: Without the lid on the egg cooker and
poacher will not work.
7. Insert the plug into a 230-240V power
outlet and turn the power on. The
indicator light will glow, indicating the
eggs are cooking.
8. Once all the water has evaporated the
unit will “tweet” signalling that the eggs
are ready.
9. Unplug the egg cooker and poacher.
10. Take the lid from the egg cooker and
poacher using the cool touch wings.
11. Serve eggs immediately to avoid
overcooking.
WARNING: This appliance is not a toy. Please
do not leave children unattended near the
appliance while in use, or while it is cooling
after use.