


Using your Sunbeam Pro Steam Iron
Before first use
Remove any adhesive stickers, plastic covers
or cardboard sleeves from the soleplate.
Ensure that all adhesive is removed by
rubbing the soleplate with a cloth dampened
with methylated spirits.
Fill the water tank and empty the water. This
will rinse out any foreign particles remaining
in the water tank from the manufacturing
process.
NOTE: When turned on for the first time, your
new iron may give off vapours for up to 10
minutes. This is due to the initial heating of
the materials used. It is safe, not detrimental
to the performance of the iron, and will not
reoccur.
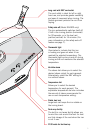
Filling the iron with water
Before filling the iron with water ensure the
power is turned off and the plug is removed
from the power outlet. The iron can be filled
with water while it is hot.
Place the iron on its heel and open the water
inlet cover.
Slowly pour water into the water inlet until
the maximum water level is reached. Do not
exceed the maximum water level indicator.
Push the water inlet cover firmly to close.
NOTE: The special soleplate design allows you
to use tap water with your Pro Steam iron
without affecting the steam performance.
However in very hard water areas, Sunbeam
recommends the use of distilled water, or
water which has been demineralised.
For best performance, we recommend the use
of Sunbeam Water Demineraliser, available
selected retailers. This will produce up to 30
litres of demineralised water.
Do not fill the iron with fabric conditioner,
starches or any other solution as these will
damage the steam mechanism. Do not use
contaminated water.
Using your iron
1. Insert the plug into a 230/240 volt power
outlet and turn the power on.
2. Turn the temperature dial to the desired
setting by aligning the setting on the
dial with the temperature indicator. The
thermostat light (positioned on the top
of the handle) will illuminate to indicate
that the iron is heating to the selected
temperature. When the thermostat light
goes out the iron has reached the selected
temperature and is ready to iron.
NOTE: When the temperature dial is changed
from a high setting to a lower temperature
setting during ironing, the thermostat light
will go out immediately. This indicates
that the iron is cooling to the selected
temperature. To ensure that the iron has
reached the selected temperature and is not
too hot, wait until the thermostat light comes
on again and then goes out before ironing.
Dry ironing
Follow steps 1 and 2 above.
3. Select DRY on the steam dial. This will cut
off the steam flow if there is water in the
tank.
Steam ironing
Follow steps 1 and 2 above.
NOTE: When steam ironing, ensure that the
temperature dial is set to any temperature
within the steam band and that the tank is at
least ¼ full of water.
3. Turn the steam dial to the desired steam
setting.
6