


7
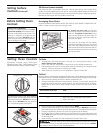
5th Burner (some models)
The 5th burner pan, chrome bowl insert and a burner grate can be used in place of the
griddle. To use the griddle area for a 5th burner, remove the griddle and place the 5th burner
pan over the burner. Then place the bowl insert and the burner grate in the proper position.
Operate the 5th burner with the griddle control knob.
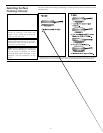
Setting Surface
Controls (Continued)
Arranging Oven Racks
ALWAYS ARRANGE OVEN RACKS WHEN THE OVEN IS COOL (PRIOR TO OPERATING THE
OVEN). Always use oven mitts when using the oven.
Before Setting Oven
Controls
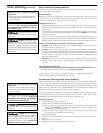
To remove an oven rack, pull the rack
forward until it stops. Lift up front of rack and
slide out. To replace an oven rack, fit the
rack onto the guides on the oven walls. Tilt
the front of the rack upward and slide the
rack back into place.
The rungs on the offset rack are slightly
raised from the edges of the rack. This raised
part of the rack is designed to allow easy and
safe removal of foods from the lower racks of
the oven and prevent hands from contacting
the hot oven door.
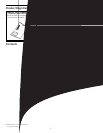
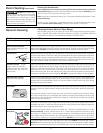
Oven Vent Location
The oven is vented through the center
rear of the cooktop. When the oven is on,
warm air is released through the vent. This
venting is necessary for proper burner
operation in the oven. DO NOT block the
vent. Doing so may cause baking failures,
fire or damage to the range.
Vent and griddle
cover hole
location
Setting Oven Controls
(Porcelain Enamel and Continuous
Cleaning Oven Only, Self-Cleaning Oven
See the Electronic Oven Control Guide)
To Bake
1. Arrange oven racks while the oven is still cool. See "Arranging Oven Racks" under
Before Setting Oven Controls.
2. Push in and turn the Temperature Control knob to the desired temperature.
3. Preheat the oven for 10 to 12 minutes before baking. Preheating is not necessary when
roasting, cooking casseroles or broiling most foods.
4. When cooking is finished, turn the Temperature Control knob to OFF.
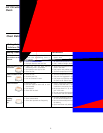
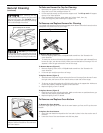
To Broil
Broiling is done in the compartment below the oven cavity. Food is broiled by the same burner
that heats the oven. The broiler compartment rolls out for easy checking and turning of food.
1. Open the broiler drawer and roll the broiler compartment out.
2. Arrange broiler pan while broil compartment is still cool. For rare meats, position the
broiler pan closer to the burner (upper position). For well-done foods such as chicken,
lobster tails or thick cuts of meat, position the pan further from the burner (lower
position).
Rack Position From Top Food
1 Rare steaks
2-3 Ham slices, fish, hamburgers and medium
steaks and chops
4 Well-done foods such as chicken and lobster
3. Push in and turn the Temperature Control knob to BROIL.
4. Place the grid on the broiler pan, then place the meat on the grid. DO NOT use the broiler
pan without the grid or cover the grid with aluminum foil. The exposed fat could ignite.
5. Push the compartment all the way into the range and close the drawer.
6. Broil on one side until food is browned; turn and cook on the second side. Season and
serve. Note: Always pull the broiler compartment out to the stop position before turning
or removing food.
7. When broiling is finished, turn the Temperature Control knob to OFF.
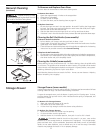
Temperature Control Knob
The broiler pan and its grid allow dripping
grease to drain and be kept away from the
high heat of the broiler. DO NOT use the pan
without its grid. DO NOT cover the grid with
foil. The exposed grease could ignite.
Should an oven fire occur, leave the oven door closed and turn the oven
off. If the fire continues, throw baking soda on the fire or use a fire extinguisher. DO NOT
put water or flour on the fire. Flour may be explosive.