


do not block the fan grill on the appliance.
- Do not use the appliance to dry textiles of any
kind.
- Any misuse or failure to follow the instructions for
use renders the guarantee and the manufacturer’s
liability null and void.
Installation
- Be sure to remove all packaging material from
inside the appliance.
- Respect the legal provisions concerning safety
distances from other elements such as pipes,
electrical connections, etc.
- Ensure that the appliance is level with respect to
the floor.
- The appliance requires suitable ventilation in order
to work properly. Leave a space of 15 cm between
walls or other obstacles and 20cm from the floor.
- Do not cover or obstruct any of the openings of the
appliance.
- Do not cover or obstruct the sides of the appliance,
leave a minimum space of 2cm around the
appliance.
- To achieve the highest efficiency from the
appliance and so as to be able to install the
appliance on a cold wall (an exterior wall) and
below a window. But never obstructing or covering a
ventilation area.
- The appliance should work well with its wall
support attached or with its base/feet attached.
Assembling the wall bracket:
- The appliance has a wall bracket (M) on which it
can be supported.
- Fix the wall bracket as you think appropriate, using
plugs, screws, and adhesive…
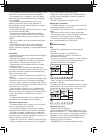
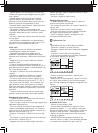
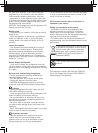
- Taking into account the separation distances
mentioned above, place the wall support in the
required position and mark the drilling points on the
wall (fig 1).
- Drill into the wall where marked and insert the
rawlplugs (fig 2).
- Place the support by matching the holes with the
rawlplugs and screw in firmly (fig3).
- Make sure that the bracket is firmly fixed; it should
be able to support twice the weight of the appliance.
- Fit the appliance into the wall support.
Fitting the base feet:
- To assemble the base feet, place the appliance
face down.
- Position the base feet on the body of the
appliance.
- Position the base feet on the body of the appliance
using the (?) screws. (Provided with the appliance)
- Stand the appliance up again so as to check that
the base feet work properly.
Instructions for use
Use:
- Unroll the cable completely before plugging it in.
- Connect the appliance to the mains.
-Switch on the appliance, using the on/off switch.
-The radiator comes on, going into stand-by mode.
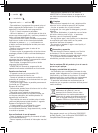
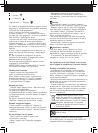
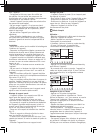
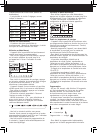
-If it is the first time you are using it, the following
information will appear on the screen:
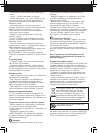
Press the operation/stand-by button to turn the
appliance on. When it is switched on, the appliance
will start in the last mode used. If it is the first time
you are using it, the following factory configuration
will appear:
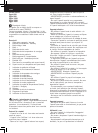
Setting the day and time
- Press the clock/date button.
- The time digits will flash on the screen. Use the +
and - buttons to move forwards or backwards until
the clock reaches the current time, and confirm by
pressing the confirm/unlock keyboard button. Repeat
the above steps to set the minutes and the
day of the week.
- CAUTION: This appliance has an internal memory.
The date and time will be stored in the appliance’s
memory provided the electricity supply is not cut off.
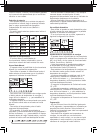
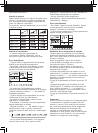
Power selection
- This appliance has a power selector that allows
the user to choose the power used in order to make
better use of energy regardless of the usage mode
(Manual or Automatic). It is possible to choose
between 3 settings, as indicated in the following
table: