


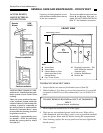
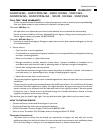
Remote
Blower
SIDE
VIEWS
Below
Counter
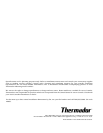
DO NOT REMOVE
Countertop Level
KEY:
Section Five: Care & Maintenance
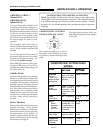
GENERAL CARE AND MAINTENANCE - COOK'N'VENT
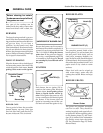
A Access Panel
B Access Panel
C Cabinet Blower or Duct
Attachment Box for the
Remote Blower
D Four Thumb Screws
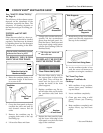
TO REACH CLEAN OUT AREA
1. Loosen (but do not remove) the thumb screws (Item D).
2. While holding C (it is heavy), move the retainer bar G up and lift
out panels A and B. Lower the retainer bar G so it will hold C in
place.
3. Do not open the electrical box E on the right.
4. Wipe up any accumulated grease inside the area. Wipe with a
cloth dampened with hot soapy water or use a general household
spray for grease. Rinse and dry before closing the compartment.
5. After cleaning, replace the access panels and securely tighten the
thumb screws.
DO NOT REMOVE BLOWER or DUCT ATTACHMENT
BOX C
(remote blower installation).
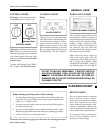
FRONT VIEW
E Electrical Connections – DO
NOT OPEN (for electrical
inspection only)
F Ventilator Reset Button
G Retainer Bar
G
F
E
D
C
B
A
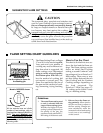
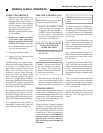
You have either a remote or a cabi-
net blower C installed on the venti-
lation system of your Cook'n'Vent
cooktop.
There are access panels at the base
of the ventilator system inside the
cabinet. If there is a shelf under the
cooktop, it must be removable as
the Access Panels A and B and the
Electrical Connection Box E must
be accessible for cleaning, electrical
inspection or service.
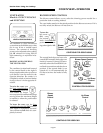
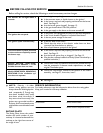
Periodically – approximately every
six months – check the enclosure
behind the access panels A and B
for food soil.
ACCESS PANELS
AND ELECTRICAL
CONNECTIONS
There are four different ways the Access
Panels A and B could have been in-
stalled. DO NOT OPEN ELECTRICAL
BOX "E". See Installation Instructions.
Frequency of cleaning depends on how
often the filters and back panel at the top
of the unit are cleaned.
Page 27
Cabinet Installation
Remote Installation