PAGE 2
PRIOR TO INSTALLATION
Step 1: EXHAUST-AIR MODE
D
Exhaust air should neither be directed into a smoke or
exhaust flue that iscurrently used for other purposes, not
into a shaft that is used for ventilating rooms in which
stoves or fireplaces are also located.
Exhaust air may be discharged in accordance with
official and statutory regulations only (e.g. national
building regulations).
Local authority regulations must be observed when
discharging air into smoke or exhaust flues that are not
otherwise in use.
D
When the extractor hood is operated in exhaust-air
mode simultaneously with a different burner which
also makes use of the same chimney (such as gas, oil
or coal-fired heaters, continuous-flow heaters, hot-water
boilers) care must be taken to ensure that there is an
adequate supply of fresh air which will be needed by
the burner for combustion.
Safe operation is possible provided that the underpressure
in the room where the burner is installed does not exceed
4 Pa (0.04 mbar).
This can be achieved if combustion air can flow through
non-lockable openings, e.g. in doors, windows and via the
air-intake/exhaust-air wall box or by other technical
measures, such as reciprocal interlocking, etc.
If the air intake is inadequate, there is a risk of
poisoning from combustion gases which are drawn
back into the room.
An air-intake/exhaust-air wall box by itself is no guarantee
that the limiting value will not be exceeded.
Note: When assessing the overall requirement, the
combined ventilation system for the entire household must
be taken into consideration. This rule does not apply to
the use of cooking appliances, such as hobs and ovens.
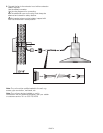
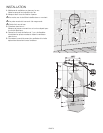
ṇ The fan must be attached at least 78
3
/
4
” from the
extractor hood.
ṇ When attaching the outer wall fan, ensure that it is
accessible for maintenance and repairs.
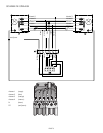
ṇ The plug-and-socket connections of the electric
cables must be located inside the building, according to
local codes.
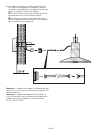
ṇ Do not reduce the 10” diameter of the pipes
connected to the extractor hood.
PRIOR TO INSTALLATION
Step 2: PREPARING THE WALL
❑ The wall must be flat and perpendicular.
❑
Ensure that the wall is capable of providing a firm hold
for mounting screws and plugs.
Weight in kg: 17,8
We reserve the right to construction changes within the
context of technical development.


