


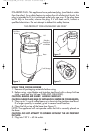


6. To start grinder, depress the on/pulse button for 10-30 seconds until the
beans are finely ground (See Figure 2). Grinding time will vary with
capacity and personal preference. Do not operate for more than
60 seconds at a time.
7. When finished grinding, unplug the base.
8. Wait until the blades stop rotating, then remove lid.
9. Remove ground coffee from stainless steel bowl.
HINTS FOR GRINDING COFFEE BEANS
• Most beans require only 10-30 seconds to grind.
• The maximum capacity of approximately
3
⁄
4
cup of coffee beans will yield
ground coffee for 10-12 cups of brewed coffee.
• Store coffee beans in an airtight container inside the freezer for up to
two months—coffee beans can be ground while frozen.
GRINDING HERBS, SPICES, AND NUTS
Use your grinder for grinding most herbs, spices, and nuts. They will have
more flavor when freshly ground. Follow directions for grinding coffee
beans and grind for 5-10 seconds. For large pieces, pulse the grinder. You
may want to consider purchasing a separate grinder for herbs, spices and
nuts since the flavor of the coffee may be affected.
HINTS FOR GRINDING HERBS, SPICES AND NUTS
• Do not attempt to grind anything oily or extremely hard such as
chocolate, cinnamon, whole cloves or nutmeg.
• Do not use to puree soft foods or attempt to make pastes from seeds, such
as sesame or sunflower.
• Do not attempt to grind grains such as corn, wheat, rice, rye, or barley.
• Rinse and pat dry herbs before grinding.
CARE AND CLEANING
Remove all excess grounds from the stainless steel bowl to prevent stale
coffee grounds from affecting the flavor of freshly ground beans.
1. Unplug the grinder.
2. Remove Lid, wash in warm sudsy water, rinse and dry thoroughly.
CAUTION: BLADES ARE SHARP. HANDLE CAREFULLY.
CAUTION: NEVER PLACE BASE OF APPLIANCE IN WATER OR OTHER
LIQUIDS.
3. Use a stiff brush to remove any remaining coffee grinds or other ground
food from inside the stainless steel bowl.
4. Clean exterior of base with a soft damp cloth and dry. Place lid on base
for storing.
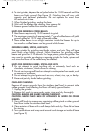
5. Turn upside down and wrap cord around cord storage on inside of base
(see Figure 3).
4
TMR_1119,B,CAN_12-4-05 4/12/05 4:52 PM Page 4