


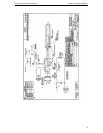


Model 1529 OWNER'S MANUAL ELECTRICAL SCHEMATICS
3
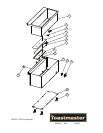
Standard pans are to be inserted into the well with their lips resting on the outside flange
of the unit.
RECEIPT AND INSTALLATION:
It is essential to inspect the unit immediately when it arrives. TOASTMASTER
®
has
placed instructions on the packaging to help avoid damage in transit. However, negligent
handling can produce hidden damage. These steps should be followed:
A. Inspect the entire perimeter of the package for damage or punctures to the packing
material. This may indicate damage to the unit inside. Call any and all damage to
the attention of the delivery person.
B. If any packing damage is found, uncrate the unit immediately in the presence of
the delivery person to determine if the unit is damaged. If any damage is found,
indicate the type and amount of damage on the shipping documents and notify
TOASTMASTER
®
at (906) 863-4401 immediately after filing a freight claim.
C. Uncrate the unit carefully and check the entire unit (top, front, back and both
sides) for any visible or hidden damage.
D. Remove the unit from the shipping pallet and inspect the bottom for any damage.
E. If any damage is noted after the driver leaves, immediately contact the freight
company and TOASTMASTER
®
.
INSTALLATION AND INITIAL START–UP:
A. Check to determine that the power source is the same voltage and phase as that
indicated on the label on the side of the unit.
B. Attach the included Appliance Legs to the bottom of the unit. Each Leg stud
screws into a threaded hole in each corner of the base.
C. Position the unit where it is to be operated and adjust the Appliance Legs so the
unit stands level and solid. TOASTMASTER
®
recommends a minimum 1” spacing
all around the sides and back of the unit when installed.
D. Set switch to the OFF position.
E. Connect your unit with the attached Power Cord into a (NEMA 5-15R Amp)
receptacle. Allow enough slack in the Power Cord to allow for equipment to be
moved about during installation and any future servicing.
F. Fill the unit with approximately 1” of hot water and the switch to the “ON”
position.
G. Check to see if unit is warming up. If unit fails to heat, check the main disconnect
and the food warmer to see if both are on. Have the installer recheck all electrical
connections.
H. Insert pans in place or cover the unit to conserve heat and prevent water
evaporation.
I. Never place food items directly into water well. Always use pans.
J. Alarm will sound if unit is out of water. This indicates more water needs to be
added.