


POLARIZED PLUG: This appliance has a polarized plug, (one blade is wider
than the other). As a safety feature to reduce the risk of electrical shock, this
plug is intended to fit in a polarized outlet only one way. If the plug does
not fit fully in the outlet, reverse the plug. If it still does not fit, contact a
qualified electrician. Do not attempt to defeat this safety feature.
This product is for household use only.
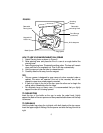
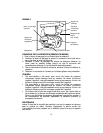
HOW TO INSTALL YOUR UNDER-CABINET CAN OPENER
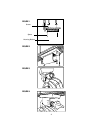
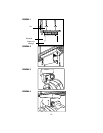
1. This can opener is designed to be installed under a cabinet
(see Figure 1). The hardware for installation is packaged in a separate
plastic bag.
To select a location for installation please consider the following:
A) An electrical outlet should be within easy reach of the cord so
that it will not drape over heating appliances or get in the way
of your normal work area.
B) Do not install above a cooking or heating area such as a stove.
2. Position the mounting bracket at least 4 inches from the wall and leave
sufficient room behind the can opener to insert a knife for sharpening.
Use the included mounting template to mark the location of the screw
holes.
3. Re-check that the unit is positioned in the desired area before drilling
the holes in the cabinet. Using a
3
⁄
16
inch drill bit, drill the 4 holes in the
cabinet.
NOTE: If the cabinet has an overhang (see template) you must use a
spacer. The spacer should be the same thickness as the amount of
overhang. The outside dimensions of the spacer are provided on the
template. If a spacer is used, longer #8 x 32 machine screws are
required. The screws should be 1
7
⁄
8
inches under the head plus the
thickness of the spacer.
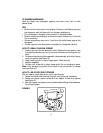
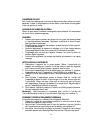
4. The four screws may be installed from the top down or from the
bottom up (see Figure 2). If installed from the top, be sure the bottom of
the screw does not interfere with the body of the can opener and
prevent assembly. If this occurs you will need to trim off the excessive
screw length or you may place a spacer under the screw head. Place
the hex nuts in the hex shaped recess of the mounting bracket and hold
in place with the end of a pencil until you engage the threads.
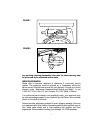
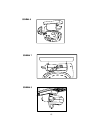
NOTE: Do not tighten the screw all the way until you have inserted all
4 screws. Tighten all four screws. Insert the unit into the bracket
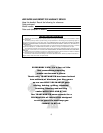
(see Figure 3). Lock can opener into place by turning Removable
Locking Knob clockwise (see Figure 4). Do not over-tighten.
3