


CLEANING INSTRU C T I O N S
1 . Unplug and cool before cleaning.
2 . R e m ove probe (DO NOT IMMERSE IN WAT E R ) . Wipe with damp cloth and dry thor-
o u g h l y.
3 . R e m ove grease cup and wa rming tray (models 883, 884S, 885 and 898S only); e m p t y
c o n t e n t s. The grill is completely immersible with probe remove d . Wash the grill, gr e a s e
c u p, and wa rming tray. D ry thoroughly. Do not wash in an automatic dishwa s h e r. A plas-
tic pad with mild abra s i ve cleanser may be used to clean underside of gri l l .
C AU T I O N : Probe and probe receptacle must always be completely dry before use.
HINTS FOR CARE AND
USE OF NON-STICK SURFAC E
• Use only nylon, plastic, or wooden utensils with care to avoid scratching the non-stick
s u r fa c e. N e ver cut food on the gri l l .
• R e m ove stubb o rn stains with a plastic scouring pad and mild dishwashing liquid; DO NOT
USE STEEL WO O L .
A ny servicing requiring disassembly other than the above cleaning must be per-
formed by an authorized service center.
2
3
C
AU T I O N : A short power supply cord is provided to reduce the risk of personal injury result-
ing from becoming entangled in or tripping over a longer cord. Extension cords are ava i l a bl e
from local hardware stores and may be used if care is exercised in their use. If an ex t e n s i o n
cord is required, special care and caution is necessary. Also the cord must be: (1) marke d
with an electrical rating of 125 V, and at least 13 A., 1625 W., and (2) the cord must be
a r ranged so that it will not drape over the countertop or tabletop where it can be pulled on
by children or tripped over accidentally.
ELECTRIC POW E R : If electric circuit is ove rloaded with other appliances, your grill may not
o p e rate properl y. G rill must be operated on a separate electric circuit from other opera t i n g
a p p l i a n c e s.
Thank you for purchasing the Toastmaster Cool Edge Gri l l
T M
. You’ll find this new grill to be
extremely ve r s a t i l e. Because it’s so easy to clean, you’ll no doubt use it often. Some rec-
ommended temperatures are listed on the probe (temperature control). For additional fo o d s,
fo l l ow package or recipe cooking instru c t i o n s.
USING YOUR GRILL
1 . B e fore use, wash the grill, grease cup and wa rming tray (models 883, 884S, 885 and
898S only) in wa rm soapy water and dry thoroughly. DO NOT IMMERSE PROBE (tem-
p e rature control).
2 . I n s e rt grease cup and wa rming tray (models 883, 884S, 885 and 898S only) into ra i l s
under gri l l . Tu rn probe to OFF position and attach securely in place.
3 . Condition the non-stick surface with ve g e t a ble shortening before heating. If necessary,
r e m ove excess oil with paper towe l . Plug into 120 V ~ 50-60 Hz outlet. Align tempera-
ture control knob with pointer.The unit is preheated when the light on the probe goes off.
The light will cycle during use indicating the proper temperature is being maintained.
4 . When finished cooking, turn probe OFF, unplug and cool before cleaning.
C AU T I O N : Because some countertop finishes are more affected by heat than others, use
care not to place grill on surfaces where heat may cause a probl e m .
C AU T I O N : G rill surfaces are hot during use.
SEAR GRILL — Models 883, 884S and 886 only
The flat portion of the Sear Grill can be used in the traditional manner for old favo ri t e s, while
the sear grid provides added options for the health-conscious eater. With its grill design,
grease drains away from the food during the cooking process.
Tips for Sear Grid
• Use tender cuts of meat for gri l l i n g .
• M a rinate tougher cuts of meats to tenderi z e them before gri l l i n g .
• To avoid drying out meat and fish, turn only once and do not pierce.
• Use a large flat plastic spatula to turn meat and fish to support the food while turn i n g .
WARMING T R AY — Models 883, 8 8 4 S , 885 and 898S only
The wa rming tray allows foods to be stored in a keep wa rm tray under the griddle for short
p e riods of time while additional foods are prepared on top of the gri d d l e.
Tips for Warming Tr ay
• Keep cooked sausage and bacon wa rm while your pancakes are cooking.
• Store cooked ve g e t a bles and meat slices while wa rming tort i l l a s.
• Stored cooked ve g e t a bles while preparing meats for favo rite dinners.
• Store cooked hot dogs and hamburgers while wa rming buns and breads.
• Store stir-fry ve g e t a bles while preparing beef, chicken or pork .
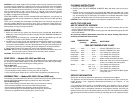
F O O D
T E M P E R AT U R E
( P r e h e a t )
T I M E
( M i nu t e s )
D I R E C T I O N S
TIME AND T E M P E R ATURE CHART
B a c o n. . . . . . . . . . . . . . . .3 2 5 ° . . . . . . . . . . . . . . . . . .8 - 1 4 . . . . . . . . . . . .DO NOT PREHEAT.Tu rn often.
S a u s a g e. . . . . . . . . . . .3 2 5 ° . . . . . . . . . . . . . . . . . .2 0 - 3 0 . . . . . . . . . . DO NOT PREHEAT.Tu rn often.
French To a s t. . . . . .3 5 0 ° . . . . . . . . . . . . . . . . . .6 - 1 0 . . . . . . . . . . . .Tu rn halfway into cooking time.
H a m bu r g e r. . . . . . . .3 5 0 ° . . . . . . . . . . . . . . . . . .3 - 1 4 . . . . . . . . . . . .Tu rn halfway into cooking time.
Ham Slices. . . . . . . .3 5 0 ° . . . . . . . . . . . . . . . . . .1 4 - 1 8 . . . . . . . . . . Tu rn halfway into cooking time.
S a n d w i c h e s . . . . . .3 5 0 ° . . . . . . . . . . . . . . . . . .6 - 1 0 . . . . . . . . . . . .Butter outside and brown both sides.
Po rk Chops . . . . . .3 5 0 ° . . . . . . . . . . . . . . . . . .2 0 - 3 0 . . . . . . . . . .B r own both sides then reduce tempera t u r e
to 225°. Tu rn halfway into cooking time.
S t e a k s . . . . . . . . . . . . . .4 0 0 ° . . . . . . . . . .ra r e 4 - 6 . . . . . . . . . . . . . . Tu rn halfway into cooking time.
m e d . 7 - 1 2 . . . . . . . . . . . .Tu rn halfway into cooking time.
we l l 1 3 - 1 8 . . . . . . . . . .Tu rn halfway into cooking time.
Pa n c a ke s . . . . . . . . . .4 0 0 ° . . . . . . . . . . . . . . . . . .2 - 6 . . . . . . . . . . . . . .Pour batter onto gri l l . When bu b bles appear
on top side, turn .
S E RVICE INFORMAT I O N
Please refer to wa r ranty statement to determine if in-wa r ranty service applies.
This appliance must be serviced by a Toastmaster authori zed service center. Consult yo u r
phone directory under “ A p p l i a n c e s - H o u s e h o l d - S m a l l - S e rvice and Repair”, or call
1 - 8 0 0 - 9 4 7 - 3 7 4 4 .
If an authori z ed service center is not ava i l a b le locally, your appliance may be return e d
postage prepaid to our National Service Center at the address shown in the wa r ranty state-
m e n t . Products must be adequately protected to avoid shipping damage. Surround yo u r
appliance with three inches of protective padding and include a note explaining the probl e m
you have ex p e ri e n c e d .We recommend insuring your pack a g e. No C. O. D.shipments accept-
e d .