


9. Turn the Function Control Knob to ESPRESSO.
The Power ON Light will illuminate (see Figure 5).
The espresso will begin to flow from the Filter
Holder Spout in 1 to 3 minutes, depending on the
amount of water added to the Water Tank. Wait
until all the water from the Water Tank has flowed
into the Carafe.
NOTE: The machine can be heard as the pressure builds, water
begins to heat and espresso is brewed.
CAUTION: Never operate the Espresso Maker without water in the
Water Tank.
10. Turn the Function Control Knob to the OFF position. The Power
ON Light will turn off. Remove the Glass Carafe from the Drip
Plate and serve.
11. FOR SAFETY REASONS, BEFORE
REMOVING THE PRESSURE
CAP OR THE FILTER HOLDER, ALL STEAM WHICH MAY BE
PRESENT IN THE WATER TANK MUST BE RELEASED. TO
RELEASE STEAM PRESSURE IN THE WATER TANK, TURN THE
FUNCTION CONTROL KNOB TO THE STEAM POSITION
(THE POWER ON LIGHT WILL ILLUMINATE) AND WAIT UNTIL
NO FURTHER STEAM EMERGES THROUGH THE STEAM TUBE.
THEN TURN THE FUNCTION CONTROL KNOB TO THE
OFF POSITION.
Do not remove the Filter Holder until all steam has been
released, and all parts are cool enough to touch.
CAUTION: Avoid contact with any steam.
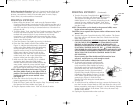
12. To discard used espresso coffee grounds,
allow the Espresso Maker and all parts to
cool; remove the Filter Holder by turning
the Handle to the left until the Handle is
positioned under the arrow marked “open”
and separates from the Espresso Maker.
Flip the Filter Handle Clip forward so that
it holds the Filter Basket in place. Turn the
Filter Holder upside-down and tap out the
grounds (see Figure 6). Fold the Filter
Handle Clip back along the Handle before
the next use.
13. To refill the unit for additional servings, remove the Pressure Cap,
turn the Function Control Knob to OFF and allow the unit to cool
before proceeding with steps 2 through 12 in this Brewing Espresso
section of this manual. If the Water Tank is hot, the water may
splatter when added.
14. Unplug the Espresso Maker after each use.
6
Figure 6
OFF
Figure 5
Power ON
Light
BREWING ESPRESSO (Continued)
Before brewing the first time, follow the instructions described in the
section: BREWING ESPRESSO, but use water only. Then, repeat the
process a second time. Wash all removable parts in warm, soapy
water. Rinse, dry and assemble as instructed.
BREWING ESPRESSO
1. Before filling the Water Tank, make sure the Espresso Maker
Function Control Knob is turned to the OFF position and the unit is
unplugged from the electrical outlet. Unscrew the Pressure Cap on
top of the machine by turning it counterclockwise. Lift and turn to
remove the Lid.
2. To fill the Water Tank, use the Glass Carafe to measure the volume
of fresh cold water required. Do not overfill. The Glass Carafe is
marked with water levels for 2 cup (minimum) and 4 cups
(maximum). Care should be taken to ensure that the correct
amount of water is placed in the Tank, as the Espresso Maker
always uses all the water.
3. Close the Pressure Cap tightly by turning it clockwise.
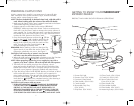
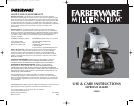
4. Place the Filter Basket into the Filter Holder (see
Figure 2). Add the desired quantity of espresso
coffee to the Filter Basket using the Measuring
Scoop provided (see Figure 3). Spread the
espresso coffee evenly in the Filter Basket and
lightly press it down. Special marks on the
inside of the Filter show the correct espresso
coffee levels for 2 and 4 cups. Remove excess
espresso coffee from the edge of the Filter.
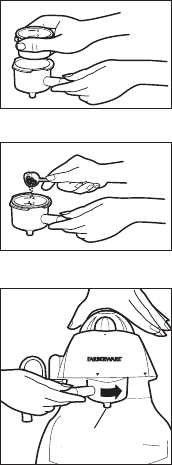
5. Make sure the Filter Handle Clip is unfolded
and resting back along the Filter Holder
Handle. Position the Filter Holder beneath the
water outlet, under the arrow marked “open”
and fit it onto the machine. Push it upwards and
turn to the right to lock to the “close” position.
NOTE: With one hand on the Pressure Cap, push
the Filter Holder firmly to the right to lock in
position. The Handle will be locked when it is
positioned under the arrow marked “close
(see Figure 4).
6. Place the Lid on the Carafe with the arrow
pointing opposite the Pour Spout.
7. Slide the Glass Carafe with Lid onto the Drip Tray directly under
the Spout of the Filter Holder (see Figure 1).
8. Plug the Espresso Maker into a 120V AC electrical outlet.
5
Filter Holder
Spout
Figure 2
Figure 3
Figure 4
close
open
FBW_FES4B_IB_10-5-06 5/10/06 2:48 PM Page 11