


USER MAINTENANCE
INSTRUCTIONS
This appliance requires little maintenance. It contains no user
serviceable parts. Do not try to repair it yourself. Any servicing
that requires disassembly must be performed by a qualified
appliance repair technician.
CARE & CLEANING
CAUTION: Do not immerse the cord, plug or Temperature
Control Probe in water or any other liquid.
CAUTION: To avoid accidental burns, allow the Electric
Skillet to cool completely before cleaning.
1. When cooking is completed, unplug the cord from the wall
outlet. Allow the Electric Skillet to cool completely.
2. Remove the Temperature Control Probe from the Probe
Socket. If necessary, wipe the Temperature Control Probe
with a damp, soft cloth. Dry the Temperature Control Probe
completely, and then set it aside.
3. Immerse the Electric Skillet and Glass Lid in hot, sudsy
water. Clean thoroughly using a sponge or soft cloth. Rinse
in hot water then dry completely.
For stubborn food particles: Loosen stuck-on food with a
plastic cleaning pad. Avoid hard scouring on the non-stick
finish as this may cause the surface to scratch.
DO NOT use steel wool, scouring pads, or abrasive
cleaners on any part of the Electric Skillet.
STORAGE
Unplug the unit and allow it to cool completely before storing.
Store the appliance in its box or in a clean, dry place. Never
store the Electric Skillet while it is hot or still plugged in.
Never wrap cord tightly around the appliance. Do not put any
stress on cord where it enters the Temperature Control Probe,
as this could cause cord to fray and break.
9
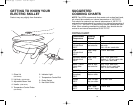
OPERATING INSTRUCTIONS
1. Make sure that the Temperature Control Dial is turned to the
“OFF” position then plug the Temperature Control Probe
securely into the Probe Socket.
ALWAYS INSERT PROBE INTO SKILLET BEFORE
PLUG-
GING INTO WALL OUTLET.
2. Plug the power cord into any standard 120V AC wall outlet.
3. Turn the Temperature Control Probe to the desired tempera-
ture and allow the Electric Skillet to preheat before cooking
(unless otherwise stated in recipe). The Indicator Light on the
Temperature Control Probe will illuminate as soon as the Dial
is rotated. The Indicator Light will then go out once the
selected temperature has been reached.
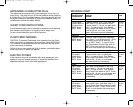
4. Add food and cook according to recipe or cooking charts.
Liquids such as broth, water, etc. may be added to the
Electric Skillet during cooking. Adjust the Temperature
Control Dial as necessary.
NOTE: During cooking, the Indicator Light will cycle on and
off indicating that the Electric Skillet is maintaining the proper
temperature.
5. When cooking is complete, turn the Temperature Control Dial
to the “OFF” position. The Indicator Light on the Temperature
Control Probe will go out. Unplug the cord from the wall outlet
and allow the Electric Skillet to cool completely.
6. Once the unit has cooled, remove the Temperature Control
Probe from the Probe Socket and follow the Care & Cleaning
Instructions.
ADJUSTING THE STEAM VENTS
The Glass Lid has two Adjustable Steam Vents located beneath
the Lid Knob. These are designed to allow excess steam to
escape during cooking.
To open the steam vents: Rotate the Lid Knob clockwise so
that the Steam Vents are lined up with the “OPEN” markings
on the Glass Lid.
To close the steam vents: Rotate the Lid Knob counter-
clockwise so that the Steam Vents are lined up with the
“CLOSE” markings on the Glass Lid.
6
FS12B_IB.qxp 5/4/2007 4:05 PM Page 13