


7. With the Timer Control set, the Toaster Oven Broiler will shut OFF
automatically when the TOAST cycle is complete. When time set
has passed, a signal will sound, and the Timer Control will finish in
the OFF position. The Power Light will turn off.
NOTE: Watch toast until desired color is achieved.
If toasting is completed before the Timer Control shuts the Toaster
Oven Broiler OFF, you may shut the Toaster Oven Broiler OFF
manually by turning the Timer Control to the OFF position. The
Power Light will turn off.
8. Open the Glass Door. Wear protective oven mitts to remove toast
from Toaster Oven Broiler. Be careful when removing toast from the
back of the Wire Rack. The inside of the Toaster Oven Broiler is very
hot. Close Glass Door.
9. Unplug unit and allow to cool before cleaning.
DO NOT LEAVE TOASTER OVEN BROILER UNATTENDED DURING
TOASTING.
See USER MAINTENANCE INSTRUCTIONS. Unplug when not in use.
HINTS FOR TOAST
• Frozen and heavy breads require a longer time setting (e.g. bagels
and English muffins).
NOTE: Use extra caution when using this Toaster Oven Broiler for
toasting pastry items with runny-type frosting or open fillings.
•When toasting more than one slice of bread, use slices of similar
size, thickness and freshness.
•One slice of bread requires a lighter setting than several slices of
bread.
• Stale bread, thin bread or sweet bread products, such as tea cakes
and fruit loaf, brown much more quickly than ordinary bread, so
they should be toasted for less time.
•Different breads require different Toast times. Turn Timer Control to
the OFF position and open the Glass Door to check toast color.
Close Glass Door and reset Timer Control if more TOAST cycle time
is needed.
• For best results, clean the Crumb Tray frequently.
COOKING CONTAINERS
• The Bake Pan included with the Toaster Oven Broiler is suitable
for items such as cookies, rolls, biscuits, and pork chops.
• Choose bakeware made of metal, or glass/ceramic without lids.
•Dark or dull pans absorb heat faster; foods will bake more rapidly
and crust will brown more easily than in shiny bake pans.
•Check package directions and/or with the ovenware manufacturer
to determine if the container is suitable for use in a Toaster Oven
Broiler.
•Do not use oven roasting bags in this Toaster Oven Broiler, as they
may come in contact with the Heating Elements.
CAUTION: Allow at least 1" air space between the top of the
container and the Upper Heating Element. Never use glass lids on
glass or metal bakeware. If a lid is necessary, cover tightly with
heavy-duty aluminum foil.
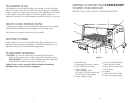
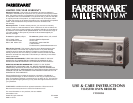
INSTRUCTIONS FOR TOAST
1. Make sure the Crumb Tray is firmly closed in the bottom of the
Toaster Oven Broiler.
2. Plug into a 120V AC outlet.
3. Remove all protective wrappings from food before placing in
Toaster Oven Broiler. Follow toaster food directions.
4. Open the Glass Door. Center food on the Wire Rack. Close the
Glass Door.
5. Turn the Temperature/Function Control to TOAST.
6. Turn the Timer Control to 10 then back to the desired Light/Dark
setting. Do not set Timer Control past time indicated on Toast
Graphics.The Power Light will illuminate.
NOTE: To set the Timer Control for less than 10 minutes, turn to 10
and then turn back to the appropriate amount of time.
NOTE: Do not set the Timer Control to the STAY-ON position when
using the Toast function.
As soon as the Timer Control is engaged, the Toaster Oven Broiler
will turn ON. Both the top and the bottom Heating Elements may
cycle ON and OFF to maintain temperature for the entire TOAST
cycle time.
CAUTION: As soon as the Timer Control is engaged, both Heating
Elements will become hot immediately. Use care not to place
anything on top of the Toaster Oven Broiler. Do not touch the
Toaster Oven Broiler or any part of the unit without wearing
oven mitts.
7 8
INSTRUCTIONS FOR TOAST (CONTINUED)