


6
NOTE: Some odor may still be detected during initial use; this is
normal and should disappear after one or two uses.
CAUTION: Do not remove or change the Plates while the unit is
hot. The appliance must cool completely before removing or
changing the Plates.
11.
To Remove Cooled Plates,
use one hand to pull out on the
metal Upper Plate Release Clip at the top of the Plate, use the
other hand to pull the Plate out from the body of the unit as
it is released. Remove the bottom Plate following the same
procedure.
USING THE WAFFLE BAKER
1. With both Plates installed Waffle side up, condition each Plate.
To condition, brush the exposed Waffle surface with cooking oil
and close the Lid. This needs to be done before each use.
NOTE: The Waffle Baker is coated with a non-stick surface. Do
not use spray-on oils, grease or shortening, as they can cause
build-up on the Reversible Plates. Use cooking oil instead.
2. Plug appliance into 120V AC electrical outlet. The Ready Light
Indicator will illuminate. Turn the Temperature Control Dial
to PREHEAT.
3. When the Ready Light Indicator goes off, the unit is ready for
use. Using a protective oven mitt, lift the Lid by the Handle and
pour approximately 1 cup of batter onto the lower Waffle Plate
using an “X” pattern and carefully close the Lid. Do not force
shut. Steam will be released between the Plates. Caution should
be taken to prevent hands from coming into contact with
the steam.
4. Turn the Temperature Control Dial to the desired setting. The
Ready Light Indicator will illuminate.
NOTE: The amount of batter used may vary with each recipe.
CAUTION: Do not leave the unit unattended during use!
CAUTION: To avoid burns, caution should be taken when
handling the Waffle Baker. The sides of the Reversible Plates
are exposed and may be hot.
5. When the Ready Light Indicator goes off the second time,
using a protective oven mitt, gently lift the Lid by the Handle to
check for brownness. If the Lid is difficult to lift, the waffle may
not be done. Close the Lid and watch for steaming to stop
before checking again.
OPERATING INSTRUCTIONS (Continued)
OPERATING INSTRUCTIONS
IMPORTANT: Before using for the first time, operate the
appliance without batter in order to burn off residues on
the Cooking Plates.
1. Carefully unpack Waffle Baker and remove all packaging
materials. Before using the Waffle Baker for the first time, wipe
both Reversible Waffle/Griddle Plates with a damp cloth to remove
all dust. Wipe all outside surfaces with a slightly damp, soft cloth.
Never immerse Waffle Baker body in water.
2. Place the appliance on a dry, clean and flat countertop surface.
3.
Install both Reversible Plates before use.
Making sure the
appliance is unplugged, place both clean Plates, either Waffle or
Griddle-side-up on a working surface near the unit.
4. Open Lid, raise the Hinge up and lay the top back so that both
Lids lie flat on the countertop.
IMPORTANT: ALWAYS INSTALL BOTH PLATES WITH EITHER
WAFFLE OR GRIDDLE-SIDE-UP.
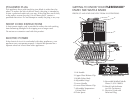
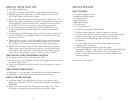
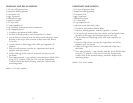
5.
Install the bottom Plate.
Grasp a
Plate, with the Drain Spout away
from the electrical cord, on the left
rear of the unit (see Figure 3).
6. Position the Plate so that its lower
edge lines up with the hinge side of
the lower body of the unit. Insert
and slide the Plate so that it rests
against the Lower Plate Release
Clip. Press the Plate down into the
body until the front Release Clip
snaps into position over the Plate.
7.
Install the top Plate,
either Waffle or Griddle-side-up, with the
Drain Spout away from the electrical cord, and in the matching
corner as the bottom Plate.
8. Position the Plate so that its lower edge lines up with the hinge
side of the upper body of the unit. Insert the Plate so that it rests
against the Upper Plate Release Clip. Press the Plate down
into the body until the top Release Clip snaps into position
over the Plate.
9. To burn off residues on the Cooking Plates, it will be necessary to
operate the unit for a few minutes before initial use. Do not add
batter or oil during this time.
10. Allow the Waffle Baker to operate until smoke and odor dissipate,
then unplug unit and allow it to cool.
5
Figure 3
Lower
Plate
Release
Clip