Dispositif d’arrêt automatique
Pour une plus grande commodité, votre cafetière est munie d’un dispositif
d’arrêt automatique. Ainsi, une fois le cycle terminé, la cafetière s’éteint
automatiquement après une période de 2 heures.
Pause et service automatique
La fonction Pause et service automatique vous permet de verser une
tasse de café avant que la préparation ne soit finie. Retirer simplement la
carafe de la plaque chauffante. Toujours garder le couvercle fermé sur la
carafe lorsque vous versez le café.
IMPORTANT: Lorsque vous profitez de la fonction Pause et service
automatique, vous devez replacer la carafe sur la plaque chauffante,
sous la cavité, d’une minute qui suivent pour éviter que le porte-filtre ne
déborde.
Replacer la carafe réamorcera le processus de préparation.
Régulateur de concentration
Utiliser le régulateur de concentration pour régler la force de votre café.
Cette fonction régularise le flux de l’eau pour soit ralentir, soit accélérer la
préparation selon la force que vous désirez obtenir.
Pour préparer une deuxième carafe de café
Pour préparer une deuxième carafe de café, éteindre la cafetière pendant
10 minutes et laisser refroidir. Vider le café moulu utilisé et répéter les
étapes de préparation.
ATTENTION: Si vous ne laissez pas l’appareil refroidir complète-
ment, l’eau pourrait surchauffer et épandre de la vapeur. La vapeur
peut causer des brûlures graves.
13
OPERATING INSTRUCTIONS
Brewing Coffee - Immediate Start
1. Plug the appliance into a standard 120V AC electrical outlet.
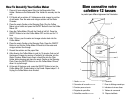
2. Open the Lid by using the lip located on top of the Coffee Maker.
3. Insert a #4 paper coffee filter inside the Removable Filter Holder.
We recommend using Melitta #4 cone-shaped filters.
4. Place coffee grounds in the filter, using one level tablespoon of drip
grind coffee for each cup of brewed coffee.
5. Fill the Carafe with cold water and pour it into the Water Chamber.
Fill to the desired level using the Water Level Indicator Window to
measure. For the best tasting brewed coffee, is recommended that
no less than 2 cups of coffee be brewed at a time. Place the Carafe
on the Warming Plate.
NOTE: Brewing less than 2 cups is not recommended.
6. Close the Lid.
7. You may choose to brew your coffee at a stronger brew strength. To
do so, press the Brew Strength Button. A filled coffee cup icon will
appear in the Display indicating a stronger brew strength.
8. Press the Power Select ON/OFF Button. The Red ON Light will illu-
minate and the word “ON” will appear in the upper right hand corner,
indicating that the brewing cycle has begun. Hot water will be dis-
pensed gently and evenly through the coffee grounds.
9. To pour a cup of coffee before the brew cycle is complete, simply
remove the Carafe from the Warming Plate and pour. Brewing will
continue but dripping will automatically pause. Return the Carafe to
the Warming Plate within 1 minute; dripping will resume.
CAUTION: To prevent injury when utilizing Pause & Pour (drip-stop)
feature, replace Carafe within 1 minute of removing during
brewing process.
10. When brewing is completed, the Coffee Maker switches to a Keep
Warm mode which will hold coffee at the proper serving tempera-
ture. To keep the coffee hot, place the Carafe back on the Warming
Plate when not serving.
11. Press the ON/OFF Button again to turn the unit OFF when not in
use. When the brewing cycle is over, the Coffee Maker will
automatically shut off after two hours.
8


