


6
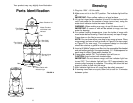
Your product may vary slightly from illustration.
Parts Identification
Brewing
1. Plug into 120V ~ 60 Hz outlet.
2. Make sure unit is in the OFF position. The indicator light will be
off.
IMPORTANT: Place coffee maker on a level surface.
3. Lift up the hinged water chamber lid and fill to desired level with
cold, fresh water for the number of mugs (one or two), using the
water level indicator inside the water chamber.
WARNING: When making one mug, do not fill above level 1.
IMPORTANT: If cream or milk will be added to mugs, use less
water for brewing.
4. For optimal holding temperature, rinse the inside of mugs with
warm water before brewing. Place lids securely on tops of mugs.
Press down on the lids to ensure proper fit.
NOTE: You can brew either one mug or two mugs at once. Place
mugs snugly on base of unit as shown in Figure A (for two mugs)
or Figure B (for one mug). The contoured design on the base
should be used as a guide for mug alignment.
5. Insert a #2 Melitta
®
paper cone filter into the removable filter basket
and add coffee grounds. Use approximately 11/
1
⁄
2
-2 tablespoons for
each mug of coffee. Close water chamber lid.
6. Press power switch ON. The indicator light will turn on.
CAUTION: Avoid contact with heated water.
IMPORTANT: Do not remove mugs until the indicator light has
turned OFF. The indicator light will turn OFF approximately two
minutes after brewing is complete. This delay will allow the last
drops of coffee to flow into the mugs.
7. After indicator light turns off, mugs may be safely removed.
8. If brewing more than one cycle, allow unit to cool for 10 minutes
between cycles.
7
Water Chamber Lid
Filter Basket
(P/N 30907)
Flow Nozzle
(P/N 30908)
Filter
Mug Lid(s)
(P/N 30909)
Thermal Mugs
(P/N 30911)
Power Switch with
Indicator Light
Water Chamber
with Water Level
Indicator
Base
FIGURE A
FIGURE B