


C. Shutdown Procedure
1. Switch the Product Selection knob to the OFF (O) position.
2. Disconnect electrical power to the toaster at the circuit breaker/
fused disconnect.
3. Allow the toaster to cool.
D. Clearing Jams
WARNING
NEVER INSERT YOUR HANDS INTO THE TOASTING CHAM-
BER TO CLEAR A JAM. SERIOUS INJURY MAY RESULT.
CAUTION
NEVER use a plastic object to clear a jam. If the toaster is not com-
pletely cool, damage to the toaster may result.
CAUTION
When clearing a jam, use care to avoid damaging the heating elements.
1. Switch the Product Selection knob to the OFF (O) position.
2. Disconnect electrical power to the toaster at the circuit breaker/
fused disconnect.
3. Allow the toaster to cool.
CAUTION - HOT SURFACES
DO NOT ATTEMPT TO CLEAR THE JAM UNTIL THE TOASTER
HAS COOLED THOROUGHLY.
4. Carefully clear the jam using a long object as a probe. This object
should preferably be made of wood, which is less likely to damage
the heating elements.
E. Daily Cleaning
WARNING
WHEN CLEANING THE TOASTER, NEVER APPLY ENOUGH
LIQUID TO STAND IN PLACE ON THE UNIT. DO NOT SPRAY,
RINSE, OR SUBMERGE THE TOASTER. EXCESSIVE MOIS-
TURE IN THE UNIT WILL CAUSE A SEVERE ELECTRICAL
HAZARD AND MAY OTHERWISE DAMAGE THE TOASTER.
CAUTION
DO NOT clean your toaster using abrasive cleaners or pads. Both will
scratch and dull the finish.
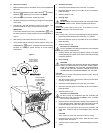
1. With the conveyor running, use a brush to clean any crumbs off the
conveyor into the crumb tray.
2. Switch the Product Selection knob to the OFF (O) position.
3. Disconnect electrical power to the toaster at the circuit breaker/
fused disconnect.
4. Allow the toaster to cool.
CAUTION - HOT SURFACES
DO NOT TOUCH HOT SURFACES ON THE TOASTER, OR
REACH INTO THE TOASTING CHAMBER, UNTIL THE UNIT
HAS COOLED THOROUGHLY.
5. Wipe the exterior of the toaster with a sponge or cloth soaked in hot
or warm detergent water. Wipe with a clean, damp cloth to remove
the excess detergent, and then wipe again to dry the toaster.
6. Remove the crumb tray and the return tray from the toaster, and
empty them. Wash the trays in warm detergent water, and rinse
them.
CAUTION
Never remove the crumb tray while the conveyor is moving.
7. Remove the entry rack from the toaster. Wash the rack in warm
detergent water, and rinse it.
8. Towel the trays and entry rack dry. Reassemble all parts onto the
toaster.
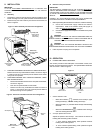
Load buns/bagels
CUT SIDE DOWN
for proper toasting
Product selection
knob in BUNS/
BAGELS position
Figure 5
B. Operation Procedure
1. Restore electrical power to the toaster at the circuit breaker/fused
disconnect.
2. Switch the Product Selection knob to either TOAST ( ) or BUNS/
BAGELS ( ), depending on the product to be toasted.
3. Allow the toaster to pre-heat for at least 20 minutes.
4. Adjust the toasting time (if necessary) by turning the conveyor speed
control knob.
5. Load the entry rack with the bakery product to be toasted. The
product will slide off the entry rack and onto the conveyor.
IMPORTANT
If the Product Selection knob is set to BUNS/BAGELS ( ), load
the bakery product CUT SIDE DOWN for proper toasting. Refer to
Figure 5.
6. After toasting, remove the product from the return tray.
7. During inactive periods, switch the Product Selection knob to the
BUNS/BAGELS ( ) position. This leaves only the lower heating
elements on, allowing a quicker recovery to normal toasting
temperatures.