


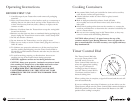


7.
6.
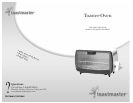
Toaster-Oven Use and Care Guide
Instructions For Toast
1. Plug into 120 V ~ 60 Hz outlet.
2. Make sure the Crumb Tray is firmly in place in the bottom of the
Toaster-Oven.
3. Open the Glass Door. Remove all protective wrappings from food
before placing in Toaster-Oven. Place Wire Rack on the Upper
Shelf Rail. Center food on Wire Rack.
4. Medium colored toast takes approximately 5 to 7 minutes.
Turn the Timer Control Dial to 15 minutes, then back to desired
toast color/time.
NOTE: Do not set the Timer Control Dial to the STAY ON position
when toasting.
CAUTION: As soon as the Timer Control Dial is engaged, both
Heating Elements will become hot immediately. Use care not to place
anything on top of the Toaster-Oven. Do not touch the Toaster-Oven
or any part of the Toaster-Oven without wearing oven mitts.
IMPORTANT: Watch toast until desired color is achieved.
5. If toasting is completed before the Timer Control shuts the
Toaster-Oven OFF, you may shut the Toaster-Oven OFF manually by
turning the Timer Control Dial to the OFF position. The Power
Light will turn OFF.
6. When the toasting time is complete, a signal will sound and the
Toaster-Oven will automatically shut OFF. The Power Light will
turn OFF.
7. Open the Glass Door. Wear protective oven mitts to remove toast or
toaster food from Toaster-Oven. Be careful when removing food
from the back of the Wire Rack. The inside of the Toaster-Oven is
very hot. Close the Glass Door.
8. Unplug unit and allow to cool before cleaning.
CAUTION: DO NOT LEAVE TOASTER-OVEN UNATTENDED.
NOTE: Additional toast cycles may require less time since the
Toaster-Oven cavity is already warm.
See User Maintenance Instructions. Unplug when not in use.
Wire Rack
The Wire Rack must be used for all cooking functions. After cooking
is complete, wear protective oven mitts to open the Glass Door and
remove the food.
3.
2.
1.
5.
4.
6.
8.
9.
10.
7.
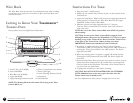
1. Crumb Tray (P/N 22668)
2. Lower Shelf Rail
3. Wire Rack (P/N 22669)
4. Upper Shelf Rail
5. Upper Heating Element Guard
NOTE: The Heating Elements will remain ON as long as the Timer
Control Dial is set.
Getting to Know Your Toastmaster
®
Toaster-Oven
Your product may vary slightly from illustration.
6. Timer Control Dial (not shown)
7. Power ON Light
8. Lower Heating Element Guard
9. Glass Door
10. Door Handle