


5.
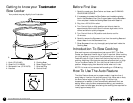
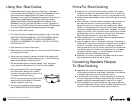
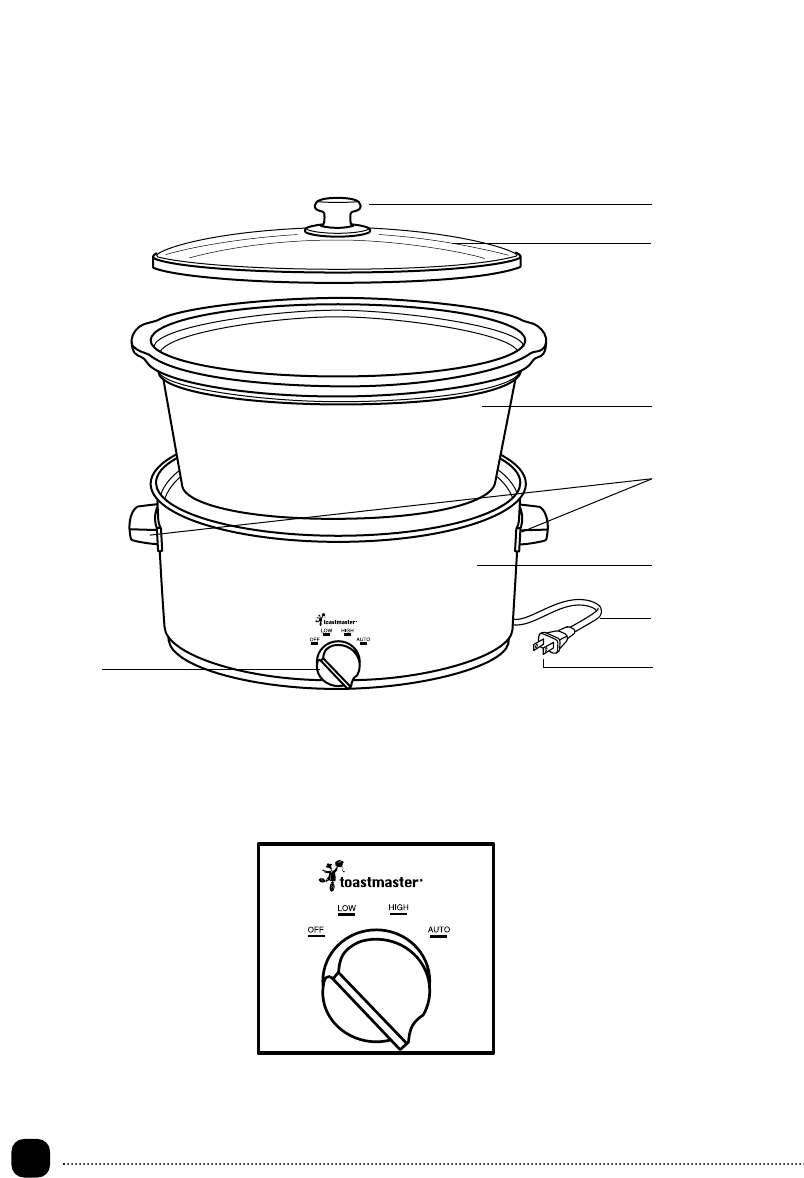
Getting to know your Toastmaster
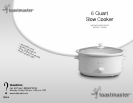
Slow Cooker
Your product may vary slightly from illustration.
4.
6 Quart Slow Cooker Use and Care Guide
Before First Use
1. Carefully unpack your Slow Cooker and clean, see CLEANING
YOUR SLOW COOKER.
2. It is necessary to operate the Slow Cooker one time before placing
food in the Stoneware Liner. Pour 2 cups of water into the Stoneware
Liner and place it inside the Cooking Base. Cover with Glass Lid.
3. Plug into a 120 V, 60 Hz outlet.
4. Turn Control Knob to High position and allow to heat for
approximately 20 minutes. You will notice a slight odor; this is
normal and should quickly disappear.
5. Turn Control Knob to Off position and allow to cool for
15 minutes.
6. Carefully remove the Stoneware Liner from the cooking Base and
discard water from the Stoneware Liner.
7. Rinse Stoneware Liner, dry thoroughly and place back inside the
Cooking Base.
Introduction To Slow Cooking
Slow cooking occurs at temperatures just around 200˚F. The Slow
Cooker can operate at Low all day or night if required. When cooking
on a High setting, it is very much like a covered pot on the stove top.
Foods will cook on High in about half the time required for Low
cooking. Additional liquid may be required as foods do boil on High.
To turn the Slow Cooker Off, turn the Control Knob to the OFF
position. Always unplug from electrical outlet when not in use.
NOTE: Lid must not be removed while cooking on LOW setting.
How To Use The Auto Feature
The Auto Feature allows you to prepare meals in less time than it
would take on Low, but not as quickly as on High. When set on Auto,
the Slow Cooker begins cooking on High. Once the High
temperature is reached, it then automatically switches to the Low
setting. When using the Auto temperature setting, you are able to
initially heat the food faster, shortening the cooking time required for
Low by approximately 25%.
1. Knob (P/N 21400)
2. Glass Lid (P/N 22020)
3. Stoneware Liner (P/N 21672)
4. Handles
5. Cooking Base
6. Power Supply Cord
7. Polarized Plug
8. Control Knob
1.
2.
3.
4.
5.
6.
7.
8.