


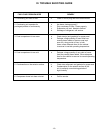
III. f - INSTALLING THE CONDENSATE EVAP (cont’d):
holes on the exterior bottom towards the rear of the
cabinet. Then, using the four (4) screws provided, at-
tach the mounting rails to the cabinet bottom (the end
flange is to be up and be facing towards the cabinet
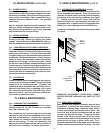
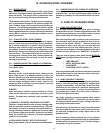
rear). Next, place the heater into the heater bracket
(note the enclosed springs are only to be used when
the heater is placed on the floor). Slide heater and
bracket into the mounting rails. Plug the supplied cord
into both the heater on one end, and the electrical
outlet provided on the cabinet exterior bottom towards
the front (see figure 4). Screw the “U-Trap” on to the
drain line located on the rear of the cabinet and then
screw the drain extension into the “U-Trap.”
A remote model is normally supplied configured for
condensate to be run to a floor drain unless purchased
with a condensate evaporator. The installer is respon-
sible for making the required extension to the floor
drain in accordance with good practice and local regu-
lations.
III. g -
REMOTE INSTALLATION:
Remote models are supplied without compressors,
solenoid valves, etc. The correct voltage, amp listing
and refrigerant are listed on the unit’s serial tag. It is
the responsibility of the installer to specify and sup-
ply the correct size compressor(s) based upon this
information and on-site requirements. Refrigerant line
installation must be done in accordance with good
practice and local regulations. See section “III. g” for
information concerning condensate removal for re-
mote models.
III. h - CORD & PLUG:
Most self-contained models are supplied with a cord
& plug attached. It is shipped coiled at the top of the
cabinet, secured by a nylon strip. For your safety and
protection, all units supplied with a cord and plug in-
clude a special three-prong grounding plug on the ser-
vice cord. Select only a dedicated electrical outlet with
grounding plug for power source. NOTE: Do not un-
der any circumstances, cut or remove the round
grounding prong from the plug, or use an extension
cord.
-3-
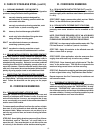
III. e -
ROLL-IN MODEL INSTALLATION:
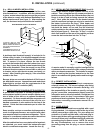
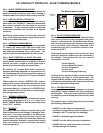
Roll-In cabinets set on the floor require the floor area
to be flat and level. In addition, after the cabinet is set
in place, sealant should be used around the perimeter
of the base to comply with National Sanitation Foun-
dation requirements (see figure 3). After sealing the
unit, the enclosed ramp should then be installed.
A stainless steel threshold ramp(s) is included to fa-
cilitate rolling in racks. It is shipped wrapped in brown
paper and secured to the rack guides inside the cabi-
net. To secure it in place, remove the two thumb
screws in the breaker strip near the bottom door open-
ing. Next, loosen the thumb screws located along the
floor at the threshold. Place the ramp(s) on top of the
loosened thumb screws and secure tabs on each end
to breaker strips with thumb screws previously re-
moved. After installing the ramp(s), it too should be
sealed to the floor.
Bumper strips are secured to the back of Roll-In mod-
els with thumb screws. Loosen these and make them
finger-tight to conform with the requirements of the
National Sanitation Foundation (NSF).
III. f -
INSTALLING THE CONDENSATE EVAPORATOR:
A condensate evaporator is normally supplied on all
self-contained models (remote models require provi-
sion of either a floor drain or an optional condensate
evaporator). On those models with the evaporator coil
compartment located on the top of the unit, the con-
densate evaporator is also secured to the top of the
cabinet. Check that the condensate pan is under the
drain tube.
Some models, such as one-section dual-temperature
reach-in refrigerator/freezers, are supplied with a bot-
tom-mounted electric condensate evaporator. This is
shipped in a cardboard carton secured to the cabinet
interior, and must be installed prior to use.
After the cabinet has been uncrated and the legs/cast-
ers attached, you must install the bottom-mounted
electric condensate evaporator. Locate the four (4)
III. INSTALLATION (continued)
Fig. 3
SEALING BASE OF ROLL-IN MODELS
A SEALANT MUST BE USED
AROUND THE PERIMETER OF THE
BASE OF CABINET AS SHOWN TO
FULLY COMPLY WITH SANITARY RE-
QUIREMENTS.
A RECOMMENDED SEALANT IS
DOW CORNING SILASTIC RTV #732
Fig. 4
U-Trap
Drain
Extension
Drain
Line
10-32 x 3/8 Screw (4)
Mounting Rails
Electric
Heater
Heater
Bracket
BMCE
Receptacle