


-4-
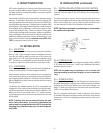
V. b - REPLACING THE GASKETS:
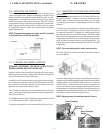
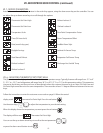
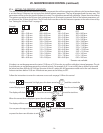
To remove the gasket to be replaced, grasp it rmly by one
corner and pull it out. Before attempting to install a new
gasket, both the unit and the gasket itself must be at room
temperature. Insert the four corners rst by using a rubber
mallet (or hammer with a block of wood). After the corners
are properly inserted, work your way towards the center from
both ends by gently hitting with a mallet until the gasket
is completely seated in place (see gure below for proper
gasket placement).
NOTE: The gasket may appear too large, but if it is installed
as indicated above it will slip into place.
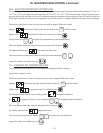
V. c - CLEANING THE CABINET SURFACES:
WARNING: DISCONNECT ELECTRICAL POWER SUPPLY
BEFORE CLEANING ANY PARTS OF THE UNIT.
Exterior stainless steel should be cleaned with warm water,
mild soap and a soft cloth. Apply with a dampened cloth and
wipe in the direction of the metal grain.
Avoid the use of strong detergents and gritty, abrasive clean-
ers as they may tend to mar and scratch the surface. Do NOT
use cleansers containing chlorine, such as bleach, this may
promote corrosion of the stainless steel.
Care should also be taken to avoid splashing the unit with
water, containing chlorinated cleansers, when mopping the
oor around the unit.
For stubborn odor or spills, use baking soda and water (mixed
to a 1 tbsp baking soda to 1 pint water ratio).
A stainless steel polish is recommended for shining of unit.
Fig. 5
SIDE DOOR PANEL
GASKET ASSEMBLY
VERTICAL GASKET
RETAINER
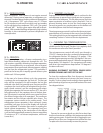
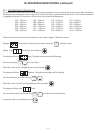
VI. a - REMOVING THE DOOR AND INSTALLING
DRAWERS:
Doors are supplied standard on all TU Series Full-Size Un-
dercounter models. However, we have engineered our
models with a drop-in feature that allows you to easily
convert door(s) into two 6” deep drawers or three 4” deep
drawers.
The door(s) on all models can easily be converted to draw-
ers in the eld. To begin the process, open the door to
its maximum position. Support the non-hinged end of
the door so minimum movement occurs. When the bolts
from the lower hinge plate are removed, remove the lower
hinge plate and then the door from the top hinge bracket
plate and then the door from the top hinge bracket. The
hinge plate pin and plastic bushing will remain in the top
hinge plate.
NOTE: The lower hinge plate is under spring tension.
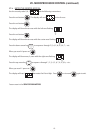
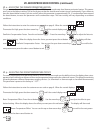
Once the door(s) have been removed, Insert drawer frame
as shown below.
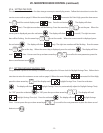
Once the drawer frame has been inserted, the drawer frame
module can be installed by tighting the black front and back
clamping knobs (2 of each) located on the cross rail locks
and liner locks. Slide the front cross rail locks towards the
center of the drawer frame module and allow the liner locks
to drop down from the top of the liner. Insert the door frame
module push towards the back of the unit. The entire frame
assembly is now installed and ready for use.
NOTE: Repeat process for multiple drawer(s) inserts.
Front Clamping
Knobs
Front Cross
Rail Locks
Back Clamping
Knobs
V. CARE & MAINTENANCE-(continued) VI. DRAWERS