2175DWRR 9
Food Storage
Drawers
The drawers should only be removed for servicing by a
trained and certified repair person.
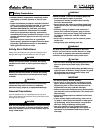
Top Storage Bin
Figure 6
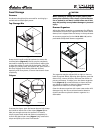
Grasp the bin handle and slide backward to access the
contents below (Figure 6). The bin may be completely
removed for cleaning once it is slid forward, making sure
it clears the guides on each side of the drawer. Then lift
straight up. If heavy items are stored in bin, push front of
bin down slightly while sliding. Slide bin forward,
especially with heavy items, to ensure that drawer closes
completely.
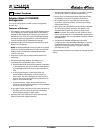
Crisper
Figure 7
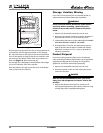
To access the crisper, open the bottom drawer fully. Grasp
the handle to either side of the crisper (Figure 7) and
slide just enough to access the contents. To remove
crisper, support both ends and slide out completely. To
remove the glass crisper cover (Figure 7, 1), remove the
crisper and push up on cover from bottom.
CAUTION
When opening or closing the crisper, pull or push
slowly and carefully. If the crisper is pulled out too
far or pushed in too hard, it could come out all the
way and possibly cause product damage or personal
injury.
Drawer Organizer
Adjust the drawer organizer to compensate for different
sized bottles or items. The organizer can be used in either
drawer, but is shipped from the factory in the top drawer.
An accessory organizer (U-Line P/N 80-48001-00) can be
purchased to keep both drawers organized.
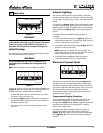
Figure 8
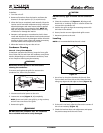
The organizer may be adjusted left-to-right or front-to-
back as required. When adjusting the organizer, open the
drawer fully, remove all items, and brace the drawer to
prevent movement. To adjust, turn the drawer organizer
knob (Figure 8, 1) counterclockwise to loosen and use
two hands to position as desired. Tighten knob after
adjustment is made. Do not over-tighten.
Clean the drawer organizer with warm water and a mild
detergent only. Do not use solvent-based or abrasive
cleaners and do not place the drawer organizer in a
dishwasher.
1
ULIN_0086_A
1
ULIN_0085_A
1
ULIN_0084_A


