


U-Line Electrical / Plumbing Specfications 12
CAUTION
Plumbing installation must observe all state and local
codes. All water and drain connections MUST BE made by
a licensed/qualified plumbing contractor. Failure to follow
recommendations and instructions may result in damage
and/or harm.
Water Supply Connection
When connecting the water supply, follow these guidelines:
• Review the local plumbing codes before you install the unit.
• Connect to the cold water supply.
• The water pressure should be between 20 and 120 psi.
• The water line MUST have a shut-off valve in the 1/4” O.D.
supply line.
• Leave approximately 8’ of water line to be coiled behind the
appliance. The water line should be looped into 2 coils. This
will allow the unit to be removed for cleaning and servicing.
However, make certain that the tubing is not pinched or
damaged during installation.
IMPORTANTIMPORTANT
U-Line requires the use of copper tubing, or U-Line water
line hook up kit (U-MPWATERHOOKUP) for installation.
Do not use any plastic water supply line. The line is under
pressure at all times. Plastic may crack or rupture with
age and cause water damage to your home.
To connect to water supply:
1. Locate the desired cold water
supply location. Attach a 1/4”
copper line to this location
and route the tubing to the
appliance. Leave
approximately 8’ of water line
to be coiled behind the
appliance. The water line
should be looped into 2 coils.
This will allow the line to flex
when removing the unit for
cleaning and servicing.
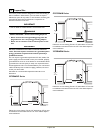
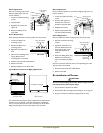
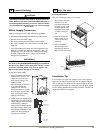
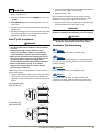
2. Locate the U-Line supplied garden
hose fitting. Ensure the end of the
copper tubing has been cut straight
and free of burrs. Slide the
compression nut and ferrule onto
the copper tubing as shown. Push
the assembly completely into the
garden hose fitting and tighten
using the two wrenches.
10 Prepare Plumbing
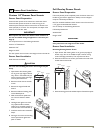
Leveling Information
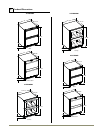
Note: It is recommended that the unit is level.
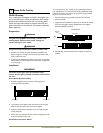
1. Use a level to check the
levelness of the unit
from front to back and
from side to side. Level
should be placed along
top edge and side edge
as shown (see Figure
24).
2. If the unit is not level,
adjust the feet on the
corners of the unit as
necessary.
3. Check the levelness
after each adjustment
and repeat the previous
steps until the unit is level.
Installation Tip
If the room floor is higher than the floor in the cut-out opening,
adjust the rear feet to achieve a total unit rear height of 1/8" less
than the opening’s rear height. Shorten the unit height in the front
by adjusting the front feet. This allows the unit to be gently tipped
into the opening. Readjust the front feet to level the unit after it is
correctly positioned in the opening.
10 Level The Unit
9/16" Wrench
1/4" Copper Water
Supply Line
7/16" Wrench
From Water Supply
to Ice Maker