


8 u-line.com
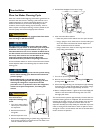
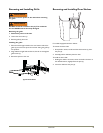
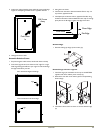
Leveling
NOTICE
Unit must be level, for proper door and ice maker (if
equipped) operation.
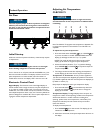
For Models with adjustable leveling feet:
1. Use a level to check the levelness of the unit from front to back
and from side to side. Place the level along top edge and side
edge as shown (1).
2. If the unit is not level, rotate the adjustable leveling legs to raise
or lower each corner of the unit as necessary.
3. Check levelness after each adjustment and repeat the previous
steps until the unit is level.
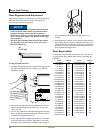
For Models without adjustable leveling feet:
NOTICE
The unit must be located on a level surface, for proper
door and ice maker (if equipped) operation.
Use a level to check the levelness of the unit from front to back
and from side to side. Place the level along top edge and side
edge as shown (1).
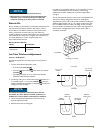
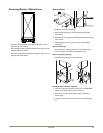
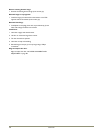
Removing and Installing Interior Shelves
1. Pull shelf out about 6" until back of shelf clears the “hump” on
the right-hand side.
2. Tilt right-hand edge of shelf
up. Remove shelf from unit by
pulling out.
Insert the shelves as follows:
1. To move to a different
position in the unit, insert
shelf at an angle,
approximately 15°-20° over
the rib in the side of the unit
where you want to place the
shelf. The shelf must be
started into the unit at an
angle to clear the door.
2. Continue to slide the shelf
into the unit at an angle until free.
3. Lower the shelf and push it in completely.
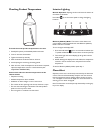
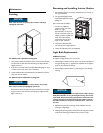
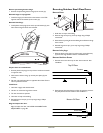
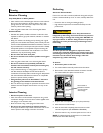
Light Bulb Replacement
CLRCO2175 Only
To replace the light bulb in your U-Line unit:
1. Find the light located at the top of the unit. Grasp the edges of
the light housing lens (1), opposite the exposed tab, and gently
push the lens toward the tab (2).
2. Pull the edge of the lens down (1) and swing it out of the light
housing.
NOTICE
ALWAYS use a genuine U-Line replacement 120V 10 watt
bulb (Part Number 31317) in the light housing. Use of any
other bulb within the housing will produce excessive heat,
causing damage to the light housing and cabinet interior,
and will compromise the precise temperature control of
the unit.
3. Replace the lens by first inserting the tab side back into the
housing at a slight angle.
4. While gently pushing the lens towards the tab end, push the free
end into the housing, and release when you hear a snap.
Maintenance
1
1
2
1
2