


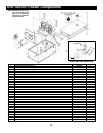

Cabinet Cleaning
Prior to placing your new refrigerator and all shelves, pans and slides into operation, it is advisable that the interior be
washed thoroughly with a mild detergent and water solution. Rinse with clear water and a sanitizing solution. Allow cabinet
to air dry.
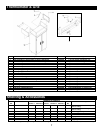
Installing Shelves
All cabinets with shelves are supplied with pilasters and shelf clip supports. Shelves are easily installed by inserting the
shelf support clips into the pilasters so they fit tightly. Align the shelf so the smaller fill wires run from front to rear and rest
the shelf on the clips.
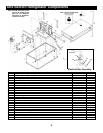
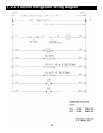
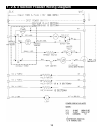
Electric Supply
Wiring should be done by a qualified electrician in accordance with local electrical codes. A
separate ground wire must
be supplied for all installations. A properly wired refrigerator or freezer will assure proper operation. Electrical supply
requirements are on the cabinet serial/data plate. It is recommended that a direct, properly protected line of the proper
size wire be installed from the main supply to your refrigerator or freezer. To assure that the correct voltage is being
supplied, while the refrigerator or freezer is in operation take a voltage reading at the motor-compressor electrical
connections, or as close to the motor-compressor as possible.
All refrigerator or freezer electrical systems are internally grounded.
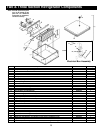
Temperature Control
Temperature control should be set to maintain a temperature of 38°F (3.3°C) to 40°F (4.4°C) for refrigerators, and 0°F
(-17°C) to -5°F (-20.5°C) for freezers.
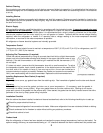
Adjusting Dial Thermometer (if required)
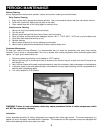
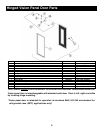
Installing Replacement Door Gasket (if required)
Removing
Beginning at one corner, pry gasket loose from the retaining strip. Peel remainder of gasket from the door and discard.
Replacing
Before replacing, be sure the gasket and door are at room temperature. (If necessary, soak the gasket in
warmwater to make it more pliable.) Align new gasket frame on the door retainer strip. Starting at one corner,
press each corner of the gasket into the retainer strip. Once started, the gasket can be easily inserted around the entire
perimeter of the door by simply press rolling into place.
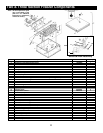
Installation Checklist
After the cabinet has been installed, leveled and cleaned as described, refer to the following checklist prior to start-up.
Check for proper electrical hook-up.
Check exposed refrigeration line connections for leaks. Make sure refrigeration lines are not dented, kinked or rubbing.
Check condenser fan for freedom to rotate without striking any stationary members.
Check that cabinet is level.
Product Load
After the refrigerator or freezer has been started and reaches the proper storage temperatures, food may be loaded. For
optimum energy efficiency, we recommend allowing a 1-1/2” clearance between the interior cabinet wall and product load.
2
Check the cabinet temperature by using an accurate hand held dial or digital thermometer
placed next to the thermometer sensing bulb (located in the upper right hand corner of your
cabinet). If the dial thermometer on the cabinet grill matches the test thermometer (±1°F)
do not adjust.
If it does not match, remove the dial thermometer lens with a small screwdriver. To adjust
the temperature needle, insert a small screwdriver in the slotted screw on the needle. Hold
the wide end of the needle to keep it from moving and turn the screw clockwise or
counterclockwise to adjust as needed. Release the needle and remove the screwdriver.
Verify new needle setting with the test thermometer. Replace the dial thermometer lens.