


76
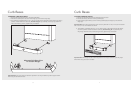
Curb Bases
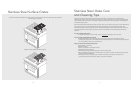
Alternate Curb Base View
for Custom Ranges
STANDARD CURB BASE FRONT
1. The standard curb base front (A) is completely assembled.
2. Remove the assembly from the carton and simply clip onto the front range legs.
3. The assembly is adjustable about 2” (5.1 cm) front to back so that alignment with the cabinet toe front is
possible. Loosen brackets on each side, but allow snug fit. Clip assembly onto range legs; determine
front to back setting; remove, tighten bolts, and reattach.
A
Important Note: The range must be installed as specified in the range installation guide for proper airflow
when using the standard curb base.
CUSTOM CURB BASE FRONT
1. Remove the standard curb base front assembly from the carton.
2. Remove the front (A) from the mounting assembly (B).
3. Attach locally supplied front (C) to the mounting assembly (B) and simply clip onto the front
range legs.
Important Note: The locally supplied front must not be any taller than 3-1/8” (7.9 cm) tall. Fronts taller
than 3-1/8” (7.9 cm) could obstruct the airflow.
4. The assembly is adjustable about 2” (5.1 cm) front to back so that alignment with the cabinet
toe front is possible. Loosen brackets on each side, but allow snug fit. Clip assembly onto
range legs; determine front to back setting; remove, tighten bolts, and reattach.
B
C
Curb Bases
Important Note: The range must be installed as specified in the range installation guide for proper
airflow when using the custom curb base.