


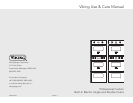


76
• Do not heat unopened food containers; buildup of pressure
may cause the container to explode and result in injury.
• Always position oven racks in desired location while oven is
cool. If rack must be moved while oven is hot, do not let
potholder contact hot heating element in oven.
• Use care when opening oven door. Let hot air or steam escape
before removing or replacing food. Hot air or steam can cause
burns to hands, face and/or eyes.
• Keep oven vents unobstructed. The oven vent is located at the
front of the oven and vents into the room.
• Do not clean door gasket. It is essential for a good tight seal.
Care should be taken not to rub, damage, or move the gasket.
• No commercial oven cleaner or oven liner protective coating
such as aluminum foil should be used in or around any part of
the oven. Improper oven liners may result in a risk of electric
shock or fire. Keep oven free from grease buildup.
• Before self-cleaning the oven, remove broiler pan, broiler grid,
oven racks, and other utensils. Do not use your oven to clean
other parts. A fan noise should be heard during the cleaning
cycle. If not, call service before self-cleaning again.
• DO NOT TOUCH HEATING ELEMENTS OR INTERIOR
SURFACES OF OVEN. Heating elements may be hot even
though they are dark in color. Interior surfaces of an oven
become hot enough to cause burns. During and after use, do
not touch or let clothing or other flammable materials contact
heating elements or interior surfaces of oven until they have had
sufficient time to cool. Other surfaces of the oven may become
hot enough to cause burns, such as the oven vent opening, the
surface near the vent opening, and the oven door window.
SAVE THESE INSTRUCTIONS
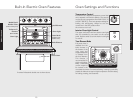
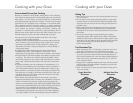
Getting Started
Getting Started
*NOTE: The PROBE function is included on Premiere Models.
Important Safety Instructions
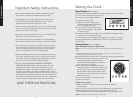
Setting the Clock
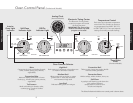
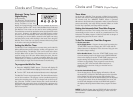
Digital Display (Select Models)
The time-of-day must be set before any other program can be used. When
your oven is first connected to the power in
your home, the timer display will show --:--.
To program the time-of-day:
1. Press the “CLOCK”* button once.
12:00 will be displayed with the word
SET in the upper right corner.
2. Turn the “SET” knob until the correct
time-of-day is displayed. AM and PM
are not indicated.
3. Press the “CLOCK” button again. The word SET will disappear and the
correct time is now set into the timer.
The time-of-day can be changed by following steps 1 through 3. It cannot
be changed while there is a Bake Hours or Start Time cycle programmed
into the timer.
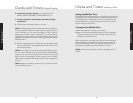
Analog Display (Premiere Models)
Synchronizing the analog and digital clocks:
NOTE: It is important to always synchronize the analog and digital clocks before setting the time-
of-day.
1. Press and release the “start time” button. NOTE: This is only necessary after a
power outage or for the first time to set the clock
.
2. Press and hold the “min/sec timer” and start time buttons simultaneously.
3. Turn the “Set” knob to move the hands on the
analog clock to 30 minutes ahead of the
current time. Release hold from “start time”
and “min/sec timer” buttons.
4. After several seconds, the display will blink.
Press and hold the “min/sec timer” button and
turn the “Set” knob to set the digital clock so
that it matches exactly with the analog clock.
The clocks are now synched and you can now
set the time of day.
The time-of-day must be set before any other
program can be used.
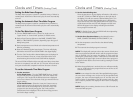
Setting the time-of-day:
1. Push and hold the “min/sec timer” and “bake time” buttons
simultaneously.
2. Turn the “Set” knob until correct time is displayed on the digital clock.
3. Release hold from “min/sec timer” and “bake time” buttons.
The analog clock’s time will automatically set to match the digital clock.
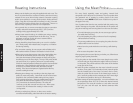
SET
M
IN/SEC
T
IMER
B
AKE
T
IME
S
TART
T
IME
C
LOCK
BAKE
TIME
MIN/SEC
TIMER
START
TIME
PROBE
TEMP
SET