8 F-38251 (09-13) REV F
ELECTRICAL CONNECTIONS
ELECTRICAL AND GROUNDING CONNECTIONS MUST COMPLY WITH THE
APPLICABLE PORTIONS OF THE NATIONAL ELECTRICAL CODE AND/OR OTHER LOCAL
ELECTRICAL CODES.
DISCONNECT ELECTRICAL POWER SUPPLY AND PLACE A TAG AT THE
DISCONNECT SWITCH TO INDICATE THAT YOU ARE WORKING ON THE CIRCUIT.
Position the range in its final location. Bring conduit containing the proper supply wire to the range through
the knockout located on the bottom of the range. Select the size and type of field wire in accordance with the
National Electrical Code suitable for carrying the equipment's rated amps and voltage. Use field wires
suitable for 75°C on units carrying more than 80 amps.
If you have purchased an EV48, EV60 OR EV72 model, it will have two (2) electrical
connections. The left and the right portions of the range are supplied with individual branch
circuits, the connection points are found under each oven or in the right hand side control panel.
THE 48, 60 AND 72 INCH UNITS HAVE MORE THAN ONE SOURCE OF ELECTRICAL
SUPPLY. EACH SOURCE MUST BE CONNECTED IN ACCORDANCE WITH THE NATIONAL
ELECTRIC CODE (LATEST EDITION) OR OTHER LOCAL CODES.
Connect supply leads to field terminal block and green grounding lead to the labeled ground lug. The supply
wire should be anchored through the access hole with a bulkhead fitting.
Ranges ship wired for 3-phase service but may be changed to 1-phase, in the field. Refer to the wiring
diagram and schematic decal attached to the range for necessary alterations.
LEVELING
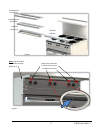
Place a carpenter's level on top of the range and level the range front-to-back and side-to-side by turning
the adjustable feet.
ACCESSORY BULLNOSE INSTALLATION
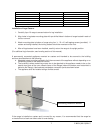
1.) Remove screws holding the switch cover in place and allow it to pivot down out of the way.
2.) Remove screws, from the front, holding the Bullnose in place.
3.) Slide standard Bullnose up to remove it from the range.
4.) Slide accessory back into the gap the standard Bullnose was removed from and align with
the side of range for fit.
5.) Start screw at one end of the Range, do not tighten completely.
6.) Going across the width of the Range install the next screw, as shown in Figure 2, set the
alignment and tighten screw completely.
7.) Install the remaining screws and tighten all screws completely.


