


F-32914 (January 2007)
www.VulcanHart.com • Fryer Technical Support: 1-800-814-2028
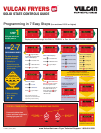
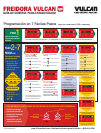
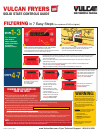
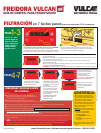
Filtering in 7 Easy Steps (for revisions V3.00 or higher)
SOLID STATE CONTROLS GUIDE
Vulcan Fryers
STEPS
1-
3
STEPS
4-7
TIP: Use provided
crumb scoop to
remove and suspend
crumbs on the bottom
of tank before
proceeding to Step 1.
Make sure that the Power Switch is in the “ON” position.
Fryer must have power to operate the motor/pump.
Fryer Temperature should be between 300-350 Degrees Farenheit.
RECOMMENDED: ADD OIL TREATMENT MEDIA.
Open the fryer doors and ensure that the filter drawer is pushed
back into place under the fryer with the “S” Tube Suction
Connector and Receptacle Block engaged.
When filtering is finished, close
the red drain valve by turning
the red drain handle.
FILL VAT displays.
• Allow all of the oil to flow back
into the fryer from the filter
pan. It is normal to see air
bubbles in the tank towards
the end of filtering.
• When the filter pan is empty,
push the
FILTER button to turn
off the motor/pump.
• Oil level should be between the
Min/Max lines on the tank back.
VAT FULL displays. (Display
is asking if the tank is full).
Once the oil level has been checked
and verified, press the TEMP button.
The burners will automatically turn
back on and the fryer will resume
heating.
HIT TEMP displays.
After pressing the TEMP
button
the fryer resumes heating.
HEATING displays.
• Turn the drain valve to allow the oil to drain into the filter pan below. The burners will automatically turn off.
• While draining the tank, use the provided tank brush to move the residue at the bottom and sides of the
tank down into drain tube.
• To turn on the filter motor/pump, push the FILTER button located on the control panel, holding it for
approximately 3 seconds.
• Allow the oil to cycle through the filtering operation for about 3 minutes or until satisfied that the
oil and fry tank are clean. DRAINING displays.
TIP: Use provided tank brush to clean and remove food particles on the fry tank.
“S” TUBE SUCTION
CONNECTOR
RECEPTACLE BLOCK
FILTER BUTTON
DISPLAY
TEMP.
BUTTON
v u l c a n
A
Follow filtering instructions steps – , however DO NOT put
oil treatment media into fryer. Drain the fryer oil into the filter pan.
B
Attach the quick disconnect hose to the discard male quick
disconnect fitting, (hose not supplied with fryer - Accessory option).
C
Place other end of the discard hose into a container that is large enough to retain the discarded shortening.
D
To start the discard operation, pull the yellow “DISCARD” handle lever rod towards you.
E
Look for the decal on the front control panel that reads:
YOU MUST USE THIS FILTER BUTTON TO DISCARD THE OIL.
Press the FILTER button and hold for approximately 3 seconds to activate the motor/pump. Oil will begin to
flow through the hose and into the container. PLEASE NOTE that the display will not change for this operation.
F
To turn off the motor/pump, simply push the FILTER button again and then push the yellow “DISCARD” lever rod back in. Disconnect
the discard hose. Be careful to let the hose drain before putting away. Close the drain valve and refill the fry tank with new oil.
NOTE:
If discard vessel is not large enough to hold the entire shortening amount, stop the flow by pushing the FILTER button to turn the
motor/pump off. Empty the container and resume discard operation by pushing the FILTER button and holding it for approximately 3 seconds
.
THESE INSTRUCTIONS ARE FOR FRYERS WITHOUT REAR OIL RECLAMATION CONNECTIONS.
ATTENTION: USE THIS FILTER BUTTON WHEN DISCARD/FLUSHING FRY TANK.
2
4
draiNiNg aNd discardiNg Oil
frOm ThE fryEr
Hot frying compound and parts can
cause burns. use care wHen operating,
cleaning, or servicing tHe fryer. use care
wHen filtering. do not leave unattended.
spilling Hot frying compound can
cause severe burns. do not move tHe
fryer witHout first draining all frying
compound from tank.
IMPORTANT: if power is mistakenly turned
off during tHe filtering operation, tHe
corrective action is as follows:
1. close drain valve
2. turn power switcH on
3. IMMEDIATELY open drain valve
4. continue filtering operation
per steps 1-7
NOTE: wHen using solid sHortening,
tHe sHortening must be liquified
before filtering.
WARNING:
S
S
7
64
2
5
1
3