


– 10 –
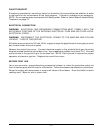
TURNING ON A KETTLE EQUIPPED WITH ELECTRONIC IGNITION (Applies to Fig. 1 or Fig. 2)
Before lighting the pilot, both the burner and pilot must have been off at least 5 minutes.
1. Remove the control panel cover screw.
2. Remove the control box cover (lift, pull out at bottom, lower).
3. Turn knob of the combination control valve counterclockwise until it stops at the ON position.
4. Replace the control panel cover and screw. Check proper jacket water level: Refer to Fig. 4,
page 9, and Jacket Water & Jacket Water Treatment, page 12.
5. Make sure gas supply is on. Turn the On-Off switch to the ON position.
6a.On kettles built after September 2003, the pilot begins sparking and the pilot burner indicator
light illuminates. The pilot burner and indicator light remain on as long as the On-Off switch
remains on. If the pilot burner goes out, the kettle controls automatically attempt to relight the
pilot for 90 seconds, followed by a 5 minute wait (this repeats until pilot lights or switch is
turned off).
6b.On kettles built from October 1998 to September 2003, the pilot begins sparking only when
the thermostat calls for heat from the main burners. The pilot burner cycles on and off with the
main burners. If the pilot burner goes out, turn the On-Off switch off for 5 minutes before
attempting to restart the pilot by turning the switch back on.
6c. On kettles built before October 1998, the pilot begins sparking and the pilot lights. The pilot
stays on as long as the On – Off switch remains on. If the pilot burner goes out, turn the On-
Off switch off for 5 minutes before attempting to restart the pilot by turning the switch back on.
7. The lit pilot can be viewed through the view port at lower front of kettle.
8. Use thermostat to regulate cooking temperatures.
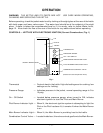
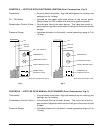
TURNING ON A KETTLE EQUIPPED WITH A MANUAL PILOT BURNER (Applies to Fig. 3)
1. Remove the control box cover screw. Remove the control box cover (lift, pull out at bottom,
then lower).
2. Swing disc to open the lighting hole (lower front).
3. After burners have been off for at least 5 minutes, open the gas shutoff valve.
4. Turn the knob of the combination control valve to the PILOT position. Using a taper, ignite
the pilot (through the lighting hole) while completely depressing the knob of the combination
control valve. Keep the knob depressed for about one minute after the pilot is lit. Release
the knob. The pilot should continue burning. If not, repeat steps 3 and 4.
5. Turn the combination control valve to the ON position.
6. Replace the control box cover. Replace the screw and reconnect the electric power.
7. If pilot light goes out, main burners will not come on. Repeat, starting from step 1.
8. Use thermostat to regulate cooking temperatures.
SHUTDOWN
Turn the thermostat dial to the OFF position. If equipped with an On-Off switch, turn it off. To
completely shut off, close the gas shutoff valve. Turn combination gas control valve off.