


GR SERIES GAS FRYERS - SERVICE PROCEDURES AND ADJUSTMENTS
F25125 (March 2003)
Page 13 of 24
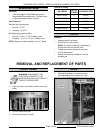
NON FILTER READY SHOWN
GAS MANIFOLD PRESSURE
ADJUSTMENT
WARNING: SHUT OFF THE GAS SUPPLY
BEFORE SERVICING THE UNIT.
GAS PRESSURE (INCHES W.C.)
GAS
TYPE
MANIFOLD
LINE
RECOMMENDED MIN MAX
Natural 4 7 5
14
Propane 10 11 11
NOTE: If the incoming line pressure is less than the
minimum stated, then the manifold pressure cannot
be set correctly.
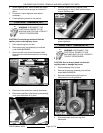
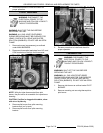
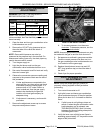
1. Open the door and turn gas combination valve
knob/extension arm
to off.
2. Remove the 1/8" NPT plug (pressure tap) on
the outlet side of the valve and attach a
manometer.
NOTE: Gas manifold pressure can also be
measured at the pressure tap in the manifold. On
Kleenscreen battery fryers only, the drain pipe may
need to be removed for access.
3. Turn the gas supply on.
4. Light the pilot burner and turn the gas
combination valve
knob/extension arm to on.
5. Set control thermostat to call for heat and verify
the main burners light.
6. Observe the manometer pressure reading and
compare to the pressure chart near the end of
this procedure.
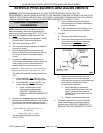
A. If other appliances are connected to the
same gas line, turn them all on and check
manometer pressure reading again. If a
pressure drop of 1/2" water column or
more is observed, then the gas supply
needs to be checked by the gas line
installer or the local gas company for
adequate sizing.
B. If adjustment is necessary, continue with
procedure.
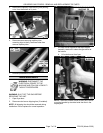
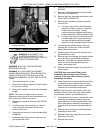
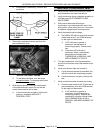
7. Remove the adjustment screw cap to access
the pressure adjustment screw.
A. To increase pressure, turn the screw
clockwise
. To decrease pressure, turn the
screw counterclockwise
.
NOTE: Accurate gas pressure adjustments can only
be made with the gas on and the main burners lit.
8. Set pressure as outlined in gas pressure table.
9. Once the correct pressure has been set, turn
the gas combination valve
knob/extension arm
to off and shut off the gas supply.
10. Replace the adjustment screw cap and 1/8"
NPT plug (pressure tap) on the outlet side of
the valve.
11. Check fryer for proper operation.
PILOT BURNER FLAME
ADJUSTMENT
NOTE: Verify the proper gas type (natural or
propane) is being supplied to the fryer
before
proceeding.
1. Turn control thermostat to off.
2. Light pilot burner and
leave gas combination
valve knob/extension arm in the pilot position.
Allow pilot to burn for 3-4 minutes to stabilize
flame.
A. If pilot burner is not lighting or does not
remain lit when the gas combination valve
knob/extension arm is released, see
TROUBLESHOOTING. Wait 5 minutes
between pilot burner lighting attempts for
unburned gas to vent.
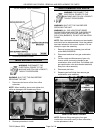
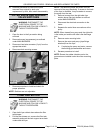
3. Verify the inner cone of pilot burner flame is
extending approximately 1/2" beyond the outer
edges of the pilot shield.