


— 7 —
WARNING: APPLIANCES EQUIPPED WITH A FLEXIBLE ELECTRIC SUPPLY CORD ARE
PROVIDED WITH A THREE-PRONG GROUNDING PLUG. IT IS IMPERATIVE THAT THIS
PLUG BE CONNECTED INTO A PROPERLY GROUNDED THREE-PRONG RECEPTACLE. IF
THE RECEPTACLE IS NOT THE PROPER GROUNDING TYPE, CONTACT AN ELECTRICIAN.
DO NOT REMOVE THE GROUNDING PRONG FROM THIS PLUG.
A 120-volt, 3-wire, 60 Hz. supply cord is supplied at the rear of the fryer.
Do not connect the fryer to electrical supply until after gas connections have been made.
An electrical diagram is located on the inside of the front panel.
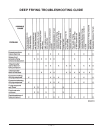
ADJUSTMENTS
To Open Front Panel
1. Remove control knob by grasping the outer edge of the knob and pulling it straight out, without
twisting or turning.
2. Turn quick connect fasteners
1
/4 turn counterclockwise.
3. Pull the top edge of the front panel to open.
Reverse the procedure to close the front panel.
Main Burner Air Supply
For efficient burner operation, it is important that a proper balance of gas volume and primary air supply
is maintained, resulting in complete combustion. Insufficient air supply results in a yellow streaming
flame. Primary air supply is controlled by an air shutter on the front of the burner.
Loosen the hexagonal head screw on front of the burner. Adjust the air shutter to just eliminate yellow
tips of burner flame. Lock the air shutter in place by tightening the screws. Repeat this procedure with
all burners.
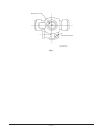
Pilot Flame
To adjust the pilot flame, remove the pilot adjustment cap to expose the adjusting screw (Fig. 1). Rotate
the adjusting screw clockwise to reduce the gas flow and counterclockwise to increase the gas flow
to provide a properly sized pilot flame (approximately
1
/2" to
3
/4" long). Replace adjustment cap.