


– 12 –
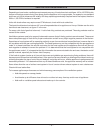
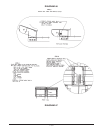
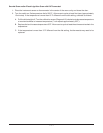
1. Remove grates, hot tops, knobs, front manifold cover and bull nose (Diagram #6).
2. Slide open burners and/or hot tops off the orifice/valve, but do not remove them from burner box. It is not
necessary to remove griddle burners unless the griddle plate is already off the unit. Be careful that the
weight of the griddle burner or burners does not cause the manifold pipe to rotate when the manifold
mounting clamps are loosened.
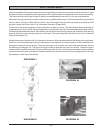
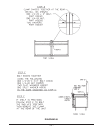
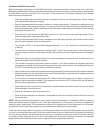
3. Loosen manifold mounting clamps enough that the manifold pipe is free to move (Diagram #7).
4. Slide units together and level with bullet feet, as necessary, so that the manifold pipes mate up. If the pipes
do not mate up, the units are not level. Do not use the manifold mounting clamps to compensate for
anything other than very minor adjustments (
1
/8" or less). Units on casters will not level up if floor is not
level. Casters must be installed wrench tight.
3. Engage the union nut with the opposing male union fitting and hand-tighten as much as possible until units
are mated up (Diagram #7).
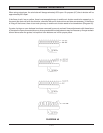
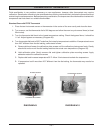
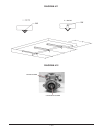
4. Locate mounting holes in the riser and top frame, then bolt the units together using the appropriate length
1
/4" bolts (Diagram #8 on page14).
5. When all the units in the battery are connected, use a backup wrench on the manifold pipe to begin
tightening the unions.
CAUTION: DO NOT ALLOW THE MAIN MANIFOLD PIPE TO ROTATE, AS THIS WILL DAMAGE THE
PILOT LINES AND/OR VALVES AND MAY CAUSE GAS LEAKS.
6. Once all the units are bolted together and the unions are tight make sure all the valves are in the original
level position. Retighten the manifold pipe mounting clamps.
7. Reinstall and bolt bull noses together (Diagram #6).
8. Reinstall any burners that were removed. Reattach the pilots that were removed. Check that burners and/
or pilot lines and fittings are in their original position and have not been damaged.
9. Install pressure regulators as needed. No more than three units are to be connected to any one,1
1
/4" gas
pressure regulator.
10. Connect battery to gas supply. Purge the air from the system. Check for leaks using a soap solution.
WARNING: DO NOT USE AN OPEN FLAME TO CHECK FOR GAS LEAKS.
11. Check and adjust gas pressure if necessary (see gas pressure adjustment and gas pressure check
sections of this manual).
12. Thoroughly check all units for packing material, protective coatings and manuals before lighting any pilots.
13. Begin lighting and adjusting pilot flames (see pilot adjustment section of this manual).
14. Check and adjust all burners as necessary (see burner adjustment section of this manual). All burners
should light within 3 or 4 seconds, maximum. It may be necessary to remove grates, hot tops, oven
bottoms and possibly the griddle plate to make the necessary adjustments.
15. At this point if no problems are noted the battery is ready to be started up. If any problems are noted they
must be corrected before the battery can be put into operation. AN AUTHORIZED SERVICER MUST
MAKE ALL REPAIRS to ensure the factory warranty is not compromised.
BATTERY INSTALLATION