


– 6 –
UNCRATING/SETUP
All Vulcan-Hart appliances are inspected and tested for function before leaving the factory. The transportation
company assumes responsibility for safe delivery of the shipment. Should an appliance arrive with apparent and/
or hidden damage, see the freight damage section of this manual.
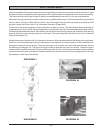
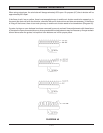
• Uncrate the appliance; carefully remove all tie-down straps and packing material.
• Locate and identify any and all loose pieces such as oven racks, rack guides, casters, legs, pressure
regulator, back shelves and owner's manual.
• Locate the rating plate and check the specifications (gas type/electrical). If they do not match the utility
connections, do not proceed with the installation. Contact the dealer and/or Vulcan-Hart Customer Service.
• Note the model and serial number of the appliances and retain for future reference.
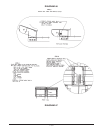
• Place the appliance in the proximity of its final location, install legs/casters and then inspect gas
connection points for obstructions and/or debris.
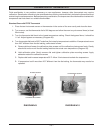
• Place the unit in its final location. Using a carpenter’s level, on the oven bottom or a solid portion of the
chassis, check the appliance to ensure it is level from side to side and front to back. Using the bullet foot,
level as necessary.
• For multiple unit installations (battery installations) see the battery installation section of this manual.
• Casters are non-leveling. If the floor is more than
1
/8" out of level, it is recommended that casters not be
used.
INSTALLATION REQUIREMENTS
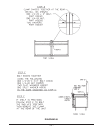
The installation must allow for adequate clearances for service and operation with a minimum of 36" in front of the
appliance.
Models with 30,000 BTU burners must maintain 20" on the left and right sides as well as 2" in the rear to combustible
materials. The older models with 20,000 BTU burners require 6" on the left and right sides as well as 2" in the rear
to combustible materials. For non-combustible locations the clearances, are 0" left, right and rear.
Snorkel convection oven models require additional clearances in the rear for the fan motor to be able to cool itself,
with a minimum of 2". When snorkel ovens are mounted on curbs and/or without legs, there must be at least 6"
of airspace behind the appliance.
There must be an adequate supply of fresh air, based on BTU consumption and exhaust volume to ensure proper
combustion as well as maximum performance.
The appliance or line up must be installed so the flow of combusted air/flue gasses are not obstructed or disturbed
in any way. Make up air, fans or drafts directed at the rear of the appliance will obstruct, inhibit or disturb the flow
of flue gasses. This will affect the oven and/or griddle performance, cause poor combustion and can damage the
operating components, which will void the appliance warranty. Do not place wall mounted objects over the
appliance.
Wall-mounted objects, appliances or shelves above the appliance will block the natural path of the flue gasses,
which can slow or stop the appliance from fluing. This will cause problems and damage to operating components,
which will void the appliance warranty.
Make up air, fans or drafts directed at the top or front of the appliance will cause problems with open burners, such
as delayed ignition and poor performance.