


BREWING COFFEE – IMPORTANT STEPS
TO FOLLOW
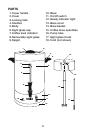
1. Remove cover and brew basket. Check to see that
spigot is closed. Use cold, fresh tap water to fill
coffee urn. DO NOT OVERFILL OR UNDERFILL. Fill
according to marking on inside of urn for number
of cups desired. Use cold tap water – the automatic
brewing cycle is timed to begin with a cold water start.
NOTE: MINIMUM BREW VOLUME IS 25 CUPS.
2. Wet the coffee basket to help keep small particles of
coffee from sifting through. Add desired amount of
REGULAR or PERCOLATOR GRIND COFFEE to
basket. Use bottom of measuring cup to smooth out
the grounds so you have a flat, even surface. Place
basket on the pump tube. The pump tube must be
resting correctly in center well in order for the unit to
brew properly.
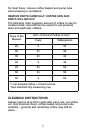
NOTE: Ground coffee quantities are printed on the side
of the brew basket and on the following page for added
convenience. The number of cups is based on the use of
a standard dry measuring cup.
3. Replace the urn cover and secure in position by
turning cover clockwise.
4. Plug into standard household 120 volt AC wall outlet.
To avoid unnecessary strain on the heating
mechanism, PLUG IN COFFEE URN AFTER THE
WATER AND COFFEE ARE ADDED.
5. When coffee brewing is complete, percolating will stop
and the green indicator light will come on. The urn
automatically switches to the “keep warm” setting to
preserve fresh-tasting coffee at hot, ready-to-serve
temperature.
7. Unplug urn when only 1 or 2 cups of coffee remain.
6