


7
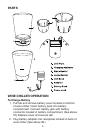
2. Note: there are two plastic baskets that come with
your wine chiller to accommodate different size wine
bottles. Insert the plastic basket that ts your wine
bottle into the wine chiller and twist clockwise to secure
into place.
3. Place wine or champagne bottle in plastic basket.
4. Fill wine chiller with cold water up to the water level
line (approximately 5 cups of water). Colder water
decreases the chilling time. Next, add approximately 6
cups of ice up to the max level.
5. Press the On/Off button. The timer display will
automatically show a starting time of 10 minutes and
the unit will begin revolving. To increase or decrease
time, press the up or down arrow until the desired
chilling time is shown on the timer display. See
recommended chilling times below. The wine chiller
will revolve for 30 seconds in a counterclockwise
direction and 30 seconds in a clockwise direction.
The timer display will count down in minutes. For the
last minute, the timer will count down in seconds
remaining for chilling time. Once the programmed
chilling time has been reached, the unit will stop and
beep 3 times before turning off.
6. During the chilling time, you can press the up or down
key to increase or decrease the chilling time.
7. During the chilling time, you can press the power key to
turn the unit off. When the power key is pressed to the
off position, the unit will beep 3 times.
RECOMMENDED CHILLING TIMES
Red wine 8 minutes
White wine 12 minutes
Champagne 15 minutes
At this point, you may insert another bottle of wine to be chilled.
Follow instructions above. NOTE: You may use the water from first
cycle but you may need to reduce the amount of water to the water
level mark. Add 6 cups of fresh ice and press the ON button.