


7
CLEANING INSTRUCTIONS
DANGER: BURN HAZARD
Contact with hot oil will cause severe burns. Allow the fryer to cool before cleaning.
Always wear protective clothing and heat resistant gloves when cleaning the fryer.
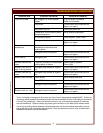
PREPARATION Turn temperature control and heat switch OFF
Allow fryer to cool completely before cleaning
Unplug fryer from receptacle before cleaning
FREQUENCY Daily, or as needed
TOOLS Mild Detergent, Non-abrasive cleanser
Soft Cloth or Sponge, Plastic Scouring Pad
Container for disposal of used oil.
CLEANING
1. Be sure basket lift is UP. Turn temperature control and power
switch OFF. Disconnect fryer from electric power.
2.
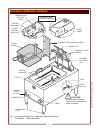
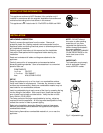
Remove fry baskets, then swing element head up and out of frypot.
NOTE: Element support rod is spring-loaded. When element
head is raised, support rod will automatically swing into position to
keep element head raised.
3. Allow oil to cool to a safe temperature (120ºF or less). Carefully
remove frypot: wearing heat-resistant gloves, lift frypot by the
handles. Drain frypot oil into a suitable container.
4. Frypot and baskets may be washed in a dishwasher, or with warm
water and mild detergent. Rinse thoroughly and dry completely.
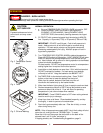
5. Wipe/brush all crumbs, breading and cooking debris from
elements. Pay particular attention to the area between the element
and the thermobulbs. Be careful that the capillary tubes of the
thermobulbs are not moved or damaged during cleaning.
6. Keep all exterior surfaces free from splashed grease by wiping with
a clean cloth dampened with warm water and mild detergent. A
non-abrasive detergent and plastic scouring pad may be used for
stubborn deposits.
IMPORTANT: DO NOT use steel wool or abrasive cleansers
as these will damage the surface finish.
IMPORTANT: DO NOT submerge fryer in water. DO NOT spill or
pour water into controls, control panel or wiring. Damage to
internal components will occur.
7. Be certain frypot is completely dry, then reinstall in fryer.
a. Be sure the TEMPERATURE CONTROL KNOB and HEAT
switch are turned OFF, then reconnect unit to electric power.
b. Lower the ELEMENT HEAD into the frypot by pushing back on
the ELEMENT LIFTING HANDLE, raising the SUPPORT ROD,
then carefully lowering the elements.
c. Add new or filtered oil to the MIN OIL line in frypot
Procedure is complete.
CAUTION:
ELECTRIC
SHOCK HAZARD
Disconnect fryer from electric
power before cleaning.
CAUTION:
BURN HAZARD
Allow fryer to cool completely
before cleaning.
CAUTION:
ELECTRIC
SHOCK HAZARD
Do not submerge fryer in
water.
IMPORTANT: DO NOT spill
or pour water into controls,
control panel or wiring.
DO NOT submerge fryer in
water. Damage to internal
components will occur.
Damage to internal
components from water
damage is not covered by
warranty.
IMPORTANT: DO NOT use
steel wool or abrasive
cleansers for cleaning the
fryer cabinet or frypot.
To remove carbonization from
frypot and element, see
PERIODIC CLEANING on
page 10.
IMPORTANT:
Nickel plated frypot must be
dried completely in order to
prevent rusting, and to
eliminate water contamination
of the cooking oil.
M302 p/n 307589 OpM Countertop Autolift Fryers