3
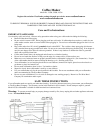
is completely secured into the handle slots. Care should be used when moving the coffeemaker as the cover only
temporarily reduces coffee from spilling if coffeemaker is tipped over.
6. Plug cord into a 120 volt AC grounded electric outlet ONLY. Also turn switch “ON” for models 13500 and 33600.
CAUTION: Your coffeemaker has a long cord for easy access to electric outlet. To prevent personal injury or property
damage, do not allow long cord to drape or hang over the edge of a countertop, tabletop or surface area where it can be pulled
by children or tripped over. Do not allow children to be near or use this coffeemaker without close adult supervision.
7. Coffeemaker will stop perking automatically (each cup requires no longer than 1 minute brewing time). Coffee is ready
when light in base glows. Coffee will remain serving temperature as long as coffeemaker is plugged in (and switch is
“ON”). Before serving turn cover to remove basket and stem. Using a hot pad, remove coffee basket, and stem. If coffee
basket and stem are not removed, bitter oils from the extracted grounds will drip into coffee. Replace cover making sure
it is completely secured into the handle slots.
8. For cup-on-saucer filling, press faucet handle down. Release handle when filled. For continuous flow when filling coffee
server, lift handle straight up until it locks into open position. Lower handle when server is filled.
9. When about 3 cups of coffee remain in coffeemaker, or when coffee can no longer be seen in the view tube, unplug cord
from electric outlet and turn switch “OFF”.
10. To reheat cold coffee, simply plug coffeemaker in and turn switch “ON”. Be sure basket and stem are removed. There
must be at least 12 cups of coffee in the coffeemaker to reheat.
INSTRUCTIONS FOR HEATING WATER FOR INSTANT BEVERAGES
Plain water may be heated in your coffeemaker for use with instant beverages. Simply fill the clean coffeemaker with cold
water to the desired cup level and place stem and clean empty basket into position as for making coffee. Secure cover in place
and plug coffeemaker in. Also turn switch to “ON” position for models 13500 and 33600. Heat water until perking stops and
light on base glows. Remove cover, lift out basket and stem, with a hot pad, and replace cover, making sure it is secured in
place. Unplug coffeemaker when less than 3 cups of water remain. Inside of coffeemaker may darken after heating water
which is normal and does not affect the coffeemaker or the water heated.
Other than making coffee or heating water, no other liquid should be heated in coffeemaker as damage to heating unit can
occur.
When a coffeemaker is used to heat water only, it must be cleaned well after each use in addition to special weekly cleaning
with white distilled vinegar for remove mineral deposits. If these deposits are not removed, pitting of the metal can occur and
result in damage to the coffeemaker. See Special Cleaning Instructions in this booklet.
INSTRUCTIONS FOR CLEANING COFFEEMAKER
Improper cleaning of coffeemaker, especially the heating well, will affect the performance, resulting in weak, lukewarm
coffee and may even cause coffeemaker to stop perking. To keep coffeemaker working properly, it is very important to
follow the regular and special cleaning instructions.
Regular cleaning—after each use
1. Unplug coffeemaker and allow to cool. Drain any coffee out of the coffeemaker.
CAUTION: To prevent personal injury or electric shock, do not immerse coffeemaker base, its cord or plug in water or other
liquid.
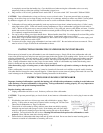
2. Wash basket, stem and cover in hot soapy water with a dishcloth or sponge. Rinse
and dry. Coffee stains on metal can be removed with a scouring pad. Do Not Clean
These Parts In Dishwasher As They Can Discolor.
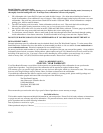
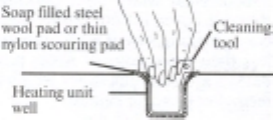
3. Clean inside of coffee maker by filling with hot water about one-third its capacity.
Add dish soap and wash with sponge or cloth. Scour heating unit well (into which
stem fits) with special cleaning tool provided and scouring pad such as Scotch Brite
®
or Brillo
®. Twist pad inside unit well to clean. Heating unit well must be kept clean for coffeemaker to work
properly. Rinse with hot water after cleaning and dry.
4. Clean outside of coffeemaker with damp cloth and dry with soft cloth. Do not use abrasive metal scouring pads or
cleansers on outside of coffeemaker as scratching will occur.


