


5
• Dishwasher Cleaning
The skillet (with heat control removed), cover and rack may be cleaned in automatic dishwasher. However, the underside of the skillet
and the inside of the cover (non-coated aluminum surfaces) will darken. This happens when minerals in water and chemicals used in
water purification are combined with detergent and the high heat of the drying cycle. Position the skillet and cover in the dishwasher so
they are not touching one another or other objects being washed. The non-stick surface of the skillet must be reconditioned with
cooking oil after each dishwasher cleaning.
SPECAIL CLEANING INSTRUCTIONS
After consistent use, the non-stick surface may discolor. Minor stains are considered normal and do not affect the performance of the skillet.
Dark and widespread staining, however which usually results from overheating and/or improper cleaning, may lessen the effectiveness of the
non-stick property. If staining occurs, treat with a commercial cleaner for non-stick finishes such as Dip-It® coffee pot destainer. Follow the
package directions. If staining is quite severe, simmer longer or repeat cleaning. (Do not use household bleach to clean non-stick finish as it
will permanently fade it.) After using the commercial cleaner, wash skillet thoroughly, rinse and dry. Recondition the non-stick interior
surface with a teaspoon of cooking oil before using. Dip-It® coffee pot destainer is available in most grocery and department stores.
• Removing a Mineral Film
A spotted white film may form on the non-stick surface. This is a buildup of minerals from water and is not a defect in the finish. To
remove , soak a soft cloth in lemon juice or vinegar and rub onto the finish. After cleaning, wash, rinse and dry. RECONDITION THE
NON-STICK SURFACE WITH COOKING OIL BEFORE USING.
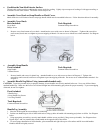
STORAGE - For compact storage, invert cover and nest inside skillet base.
TEMPERATURE GUIDE
WARM Crisping; keeping meats, casseroles and vegetables warm for serving
SIMMER Simmering, warming leftovers; preparing frozen foods; heating soups;
cooking casseroles, pudding, cereals; baking apples; braising and roasting
meats and poultry
225° F Preparing gravy; white sauce and cheese sauce; cooking frozen and fresh
vegetables; baking beans
250° F Scrambling and frying eggs
300° F Frying bacon and sausage
325° F Browning meats and poultry; frying fish, ham chicken and potatoes
350° F Grilling French toast and pancakes
375° F Grilling Sandwiches
400° F Heating frozen pizza
ROASTING- Best Suited for skillets with a high dome cover.
Beef, pork, lamb, veal and poultry may be roasted in the skillet. To obtain more satisfactory results, a metal wire rack , which may be
included with your skillet, should be used to lift the food off the cooking surface. If rack is not included with skillet, a metal wire rack that
fits into the bottom of the skillet and is about ½ inch high with smooth support legs can be used. Follow these basic guidelines.
1. To help seal in natural juices, roasts should be browned in the skillet before roasting. Simply preheat the skillet uncovered, at 325° and
add the roast. Brown, as desired, on all sides. Remove roast, place rack into the skillet and replace roast on rack, fat side up. Season as
desired.
2. Insert meat thermometer tip into thickest part of roast making sure it does not touch a bone or rest in fat. Cover skillet and roast at 225°.
If spattering of juices becomes excessive during the roasting period, reduce the temperature to SIMMER. A small amount (½ cup) of
water may be added if desired.
3. Roast meat to recommended or desired internal temperature, see Roasting Chart. Turn skillet OFF. Avoid removing the cover too
frequently as roasting time will be lengthened. Remove roast from rack and allow to
stand 10 minutes for easier carving. Always use
hot pads to remove rack. Juices in the skillet may be used for gravy, if desired.