


2
Wash skillet, cover and rack if included, in hot soapy water with a sponge or dishcloth to remove any manufacturing oils.
Rinse thoroughly, then dry, including terminal pins inside socket of skillet where heat control fits.
• Condition the Non-Stick Interior Surface
The non-stick surface must be conditioned to ensure stick-free cooking. Lightly wipe a teaspoon of cooking oil with paper
toweling or a soft cloth over the entire interior surface. Let oil remain on the surface. The skillet is now ready for use.
• Assemble Handle/Legs Before Using (unassembled models only).
CAUTION: To prevent personal injury or property damage, be sure handles/legs are securely attached before use. Never
use skillet without attached handle/legs. Make sure that screws are inserted straight into skillet mounting projections for
proper assembly. To prevent stripping of threads do not over tighten screws.
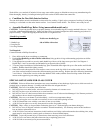
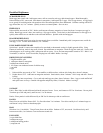
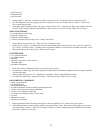
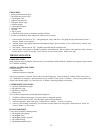
*Handle/Leg Assembly
Parts Included: Position one handle/leg on
2 Handle/Legs side of skillet with socket.
4 Long Screws
2 Leveling Washers
Tool Required:
Common Slotted or Phillips Screwdriver
1. Place skillet upside down on tabletop or countertop.
2. Position first handle/leg on side of skillet with socket, lining up holes in legs with mounting projections on skillet.
See Diagram 1.
3. Using appropriate screwdriver securely attach handle/leg with two of the long screws provided. See Diagram 1.
Repeat Steps 1 and 2 to assemble second handle/leg on opposite side of skillet.
4. To assure proper installation of skillet handle/legs, place assembled skillet right side up on a flat surface and lift with
handles. Handles should feel tightly secured.
5. If the skillet rocks when placed on a flat surface, remove screw on the leg which is not resting on the surface. Install
one of the enclosed washers between the skillet mounting projection and leg. Replace the screw following instructions
3 and 4 above. If the skillet is not level after the addition of the washer, add the second leveling washer in the same
manner to the opposite leg not resting on surface.
SPECIAL SAFEGUARDS FOR GLASS COVER
CAUTION: Failure to follow these instructions may cause immediate or later breakage of glass cover, which can result in
personal injury or property damage. Carefully read and follow the safeguards below:
CAUTION: Glass cover can shatter from direct heat.
• DO NOT place cover under broiler, microwave browning element or in a toaster oven.
• DO NOT set glass cover on hot burner or on oven heat vent.
• DO NOT use cover if it has been used in the above manners even if it does not look damaged. See Warranty section in
this booklet on how to obtain a replacement cover.
CAUTION: Glass cover can shatter if cooled suddenly. Avoid severe temperature change.
• DO NOT set hot glass cover on cold or wet surface; let cover cool before placing in water.
• ALWAYS handle hot cover with dry oven mitts; do not use wet cloths.
• ALWAYS set hot glass cover on dry, heat-protective surface for gradual cooling.
CAUTION: Chips, cracks, or deep scratches weaken the glass cover. Weakened glass can shatter during use.
• DO NOT use cover if chipped, cracked or scratched. Discard immediately. See Warranty section in this booklet on
how to obtain a replacement cover.
• ALWAYS follow care and use instructions in this booklet to avoid chip, cracks and scratches due to hitting rims, using
metal utensils, using abrasive scouring pads or cleansers or from accidental impact.
CAUTION: To prevent personal injury or steam burns when removing cover from skillet base:
• ALWAYS use oven mitts or hot pads when removing or replacing glass cover.
• ALWAYS tilt cover toward you to prevent steam burns.