


10
ASSEMBLING YOUR BLENDER ATTACHMENT (if included)
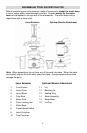
Before assembling your blender attachment, wash all loose parts, except the motor
base in warm, soapy water, rinse thoroughly and dry. All parts except the motor
base can be washed in the top rack of the dishwasher. The motor base can be
wiped clean with a damp cloth.
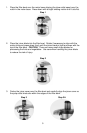
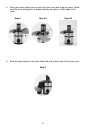
1. Place the blending jar upside down on the table or counter with the bottom
facing up. Note: Do not place the glass blending jar directly on a very hard
surface such as ceramic or granite. The glass may become chipped or
damaged.
2. Center and place the sealing ring on the rim of the blending jar.
3. Place the blade assembly on top of the sealing ring. Thread and secure the
blade base onto the bottom of the blending jar by turning clockwise.
4. Place the blending jar assembly on the motor base.
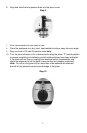
5. Place the lid on to the blending jar by pressing it in to place making sure that it is
properly lined up to cover the pour spout and seal the blending jar.
6. Place the lid cap on to the lid by lining up the flanges over the flange openings.
Make a ¼ turn clockwise to secure it in place.
USING YOUR BLENDER ATTACHMENT (if included)
1. Place appliance on a dry, level, heat-resistant surface, away from any edge.
Note: Do not operate this appliance where dust or flour can be suctioned up into
the vent openings, as this will cause damage to the appliance.
2. Place assembled blending jar on to the motor base.
3. Plug cord into a 120 volt AC electric outlet only.
4. Put liquids into the blending jar first unless the recipe calls for an alternate
processing sequence.
5. Prepare ingredients for blending by cutting all solid ingredients (fruits,
vegetables, etc.) into uniform pieces, ½ to 1-inch cubes.
6. Place the lid on the blending jar.
7. Place the lid cap into position on the lid. Note: Always place a hand on the
blending jar or lid to steady the blender while it is operating.
8. Blend foods according to the recipe or until the desired results are achieved.
Note: If scraping or stirring of contents is required, turn blender to “0” (OFF) and
unplug from electrical the outlet. Do not use metal utensils to stir as they may
scratch the blending jar.
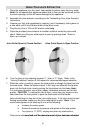
9. The lid cap may be removed while blending to add ingredients. CAUTION: To
prevent the risk of injury, do not remove the lid while blending. Be sure the
blades have stopped rotating before removing the lid.