6
9
OPERATING INSTRUCTIONS
NOTE: To activate the "Moo Sound" remove the insulating tab from under the cow's chin. You can
make your mooWHICH™ 2 - Slice Sandwich Maker "Moo" by pressing the Sound Activation
button under the cow's chin. This will have no affect on the operation of your Sandwich Maker.
1. Plug into a 120V AC power outlet.
2. Close the Lid.
3. The Red ON/OFF Indicator Light illuminates. Preheat the Sandwich Maker for approximately 3-4
minutes. When the Green READY Light goes off, the unit has preheated properly and you may
begin assembling sandwiches.
NOTE: DURING TOASTING, THE GREEN READY INDICATOR LIGHT WILL TURN ON AND OFF AS THE
SANDWICH MAKER KEEPS THE SET TEMPERATURE CONSISTENT.
4. While the Sandwich Maker is preheating, we suggest that you prepare your sandwiches and fillings.
NOTE: When preparing to use the Sandwich Maker for the first time, place a small amount of butter,
margarine or cooking oil into each of the triangle-shaped Plates. This will ensure that
sandwiches will be easier to remove when cooking is complete.
NOTE: Initially, some smoking may occur. This is normal for newly manufactured appliances and will
not occur after the first few uses.
5. After preheating, place one slice of bread, buttered side down, onto either cooking surface.
Spoon approximately 1-2 tablespoons of the filling onto the bread, leaving a 1/4" border around
bread. Top with a second slice of bread, buttered side up.*
6. Hold your spatula (or other non-metal utensil) in front of the sandwich to prevent the top slice
from sliding forward as you close the Lid. Fasten the Locking Lid Latch and press down until it
snaps into the “LOCK” position.
7. Allow the sandwiches to toast for approximately 2 - 3 minutes.
8. Your Sandwich Maker toasts both sides of the sandwich at once and seals in the flavor. The sand
wich will be formed into two sealed halves.
9. To remove the toasted sandwich, always use a plastic or wooden spatula. Never use a sharp or
metal object as it may damage the non-stick surface of the Cooking Plates.
10. Allow to cool to a safe handling temperature. If 4 pockets are preferred, use a pizza cutter or
serrated knife to cut the pockets apart.
11. Disconnect the plug from wall outlet when not in use.
* If you choose not to butter your bread for dietary reasons, periodically oil the cooking surface for
easier removal of the toasted sandwiches.
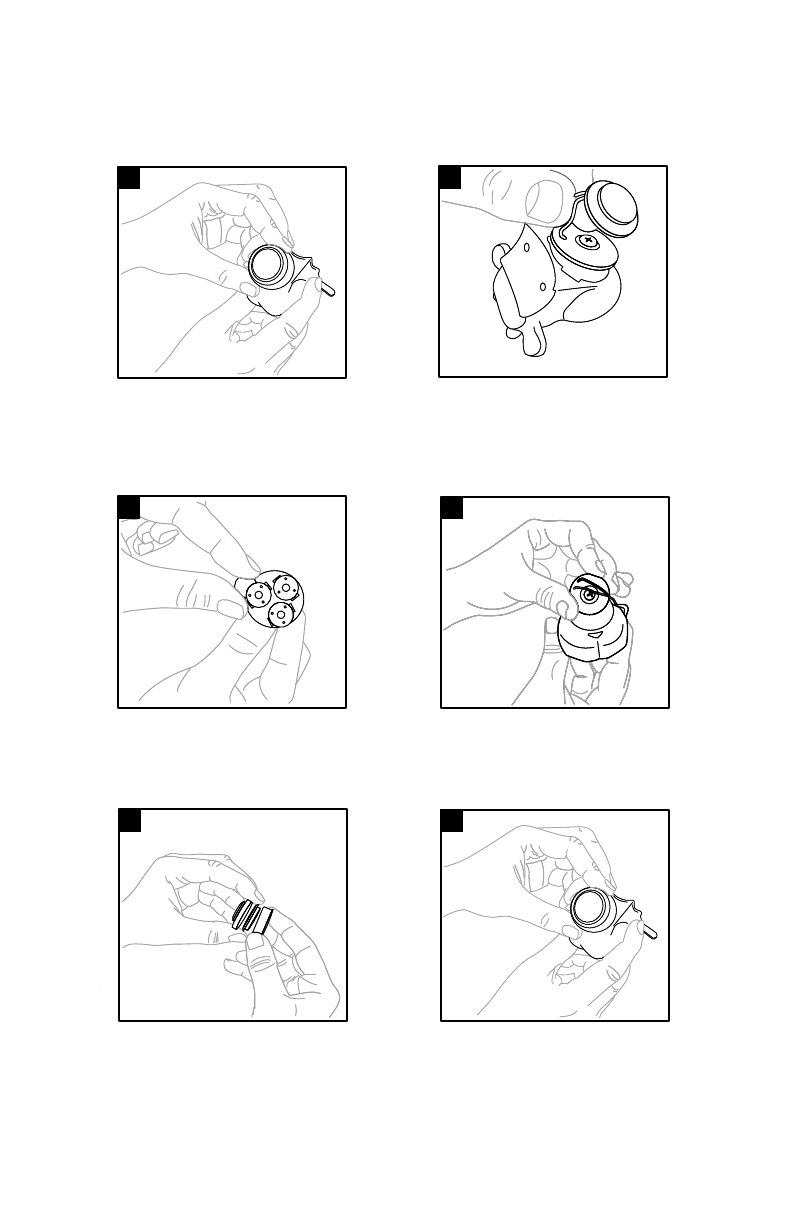
TO REPLACE BATTERIES:
If your mooWICH™ no longer "moos", you may need to replace your batteries.
To do so, follow the steps below:
Your mooWICH™ will be ready to moo!
Pull out speaker underneath
the cow's chin. This should pry
out easily.
Remove battery pack from
beneath the cow's chin.
Replace each battery by pushing
batter out from back of clamp.
Replace with battery type LR1130.
Place the battery pack back
underneath the cow's chin.
Put speaker back together as
shown in illustration.
Replace the speaker underneath
the cow's chin.
