Toasting Bread
1. Center the bread in the Toasting Slots.
2. Set the Browning Selector to the degree
of browning required.
NOTE: The Browning Control is
electronic–moving the Browning
Selector after toasting has started
will not change the degree of
browning.
3. Press the Toasting Lever down
fully–the Lever will not lock down
unless the Toaster is plugged in to an
electrical outlet.
The CANCEL Light will illuminate, and
will stay on until the toasting cycle is
stopped, either automatically, when the
toast is ready, or manually, if you press
the CANCEL Button.
4. When the toasting cycle is completed,
the toast will pop up.
5. EXTRA LIFT: When toasting small items
(bagels, crumpets, etc.) the Toasting
Lever may be raised further, to allow
them to be removed more easily.
Cancel Button
If you wish to stop the toasting cycle before
it is complete, press the CANCEL Button.
The elements will be turned off, the toast will
pop up, and the CANCEL Light will go out.
Toasting Bagels
This feature takes the guesswork out of
toasting bagels.
Leave the Browning Selector at your
favorite setting. Split the bagel, put one half
in each toasting slot, lower the Toasting
Lever, then press the BAGEL Button. The
BAGEL Light will illuminate, and will stay
on until toasting is complete.
The toasting time will be altered
automatically to give your bagel the same
degree of browning you like on your toast.
Reheating Toast
This Toaster has a special setting for
reheating toast, which overrides the
Browning Selector.
To reheat toast which has cooled, place it in
one of the toasting slots, lower the
Toasting Lever, then press the REHEAT
Button. The REHEAT Light will illuminate, to
show that this feature is operating, and the
toast will be given a short burst of heat
before popping up.
NOTE: Only reheat plain, unbuttered toast.
Frozen Bread
Leave the Browning Selector at its normal
setting, place the frozen bread into the
toasting slots, lower the Toasting Lever,
then press the FROZEN Button. The
FROZEN Light will illuminate, and will stay
on until toasting is complete.
The toasting time will be altered
automatically to give the same degree of
browning you get with unfrozen bread.
5 6
Before Using For The First Time
1. Carefully unpack your Toaster and
remove all packaging materials. Remove
any labels from the outer stainless steel
surfaces.
2. To remove any dust that may have
accumulated during packaging, simply
wipe the Toaster exterior with a clean,
damp cloth.
3. Do not use abrasive cleansers.
4. Do not put the Toaster, cord or plug in
water.
5. Before making toast for the first time,
operate the Toaster without bread and
with the Browning Selector set at the
maximum setting. This will help to burn
off any dust etc. which may have
accumulated on the elements. The new
elements may give off an unpleasant
smell but this should not be a cause for
alarm. Make sure the room is well
ventilated while doing this.
To Operate Toaster
1. Position the Toaster on a firm, level,
heat-resistant surface, clear of curtains,
draperies, and other combustible
materials.
WARNING: Do not place the Toaster on or
near items that may become
damaged even by moderate
sources of heat.
2. Unwrap power cord from Cord Storage
Wrap on the underside of the Toaster.
3. Plug the power cord into a 120V AC
electrical outlet.
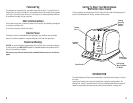
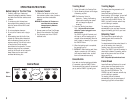
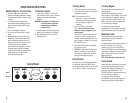
Control Panel
OPERATING INSTRUCTIONS
Lights
Buttons


